I still remember the day I realized that diy kitchen organization wasn’t just about having a big budget or a lot of space. I was living in a tiny apartment, struggling to find room for all my kitchen essentials, and feeling like I was stuck with a cluttered, inefficient space. But then I stumbled upon the world of DIY organization, and everything changed. I learned that with a little creativity and some basic tools, I could turn even the smallest kitchen into a functional oasis. I started experimenting with different projects, from building my own shelves to repurposing old containers, and soon I had a kitchen that was not only organized but also beautiful.
In this article, I’ll be sharing my favorite no-nonsense tips for achieving amazing diy kitchen organization. I’ll show you how to create custom storage solutions, maximize your counter space, and make the most of every inch in your kitchen. My goal is to empower you with the knowledge and confidence to take on your own DIY projects, regardless of your skill level or budget. I’ll provide you with step-by-step instructions, budget-friendly ideas, and practical advice to help you overcome common kitchen organization challenges. By the end of this guide, you’ll be equipped with the tools and inspiration you need to transform your kitchen into a space that’s both beautiful and functional.
Table of Contents
Guide Overview: What You'll Need
Total Time: 4 hours 30 minutes
Estimated Cost: $50 – $100
Difficulty Level: Intermediate
Tools Required
- Drill (with screwdriver and drill bits)
- Tape Measure
- Level
- Pencil
- Utility Knife (with extra blades)
- Saw (circular or handheld)
- Sandpaper (various grits)
Supplies & Materials
- 2-in x 4-in lumber (for shelves)
- 3/4-in plywood (for shelf boards)
- Wood screws (1 inch and 2 inches)
- Wall anchors
- Adhesive hooks
- Baskets or containers (for storage)
- Label maker (optional)
Step-by-Step Instructions
- 1. First, let’s start by assessing our kitchen space and identifying the areas that need the most organization. Take a good look around your kitchen and make a list of the things that drive you crazy, like cluttered countertops or a messy cabinet. For me, it was the lack of storage for my cooking utensils and spices, so I knew I had to come up with a creative solution.
- 2. Next, gather your materials and tools, including a drill, some wooden planks, and a few baskets or containers. I like to think of this step as the fun part, where you get to brainstorm and experiment with different ideas and materials. Don’t be afraid to get creative and try out new things – it’s all part of the DIY process!
- 3. Now it’s time to start building your DIY kitchen organization system. Begin by measuring your space and cutting your wooden planks to size. I used a simple shelf design to maximize my kitchen’s vertical space, but you can customize your project to fit your specific needs. Just remember to take your time and double-check your measurements to avoid any mistakes.
- 4. Once you have your shelves built, it’s time to add some storage containers and baskets. I like to use repurposed materials like old mason jars or wooden crates to add a touch of personality to my kitchen. You can also use plastic bins or woven baskets – just make sure they fit your shelves and are easy to clean.
- 5. With your shelves and containers in place, it’s time to start organizing your kitchen utensils and gadgets. I like to group similar items together, like all my baking supplies or cooking utensils, and store them in labeled containers. This makes it easy to find what you need when you need it, and it also helps keep your kitchen looking tidy and organized.
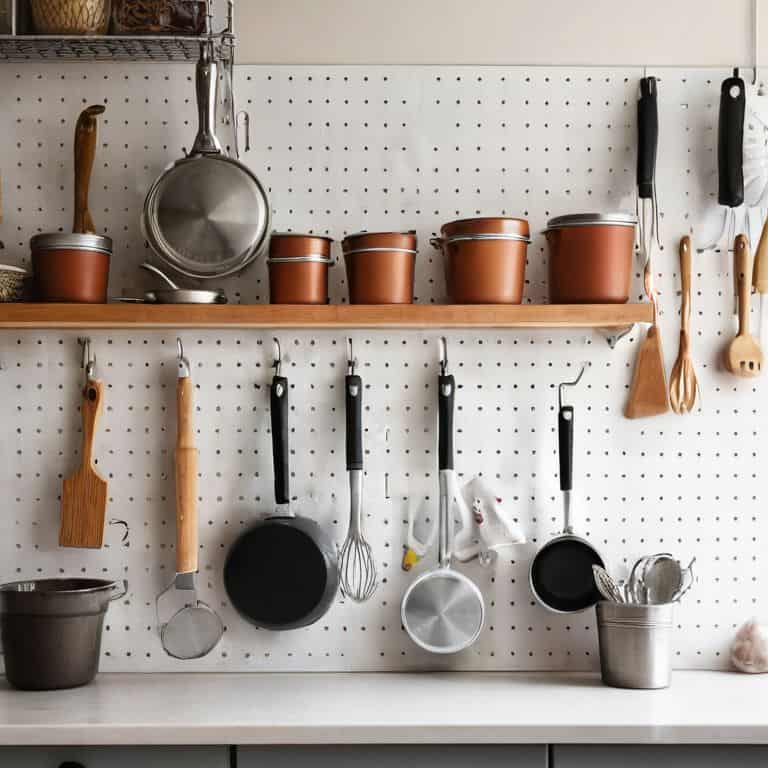
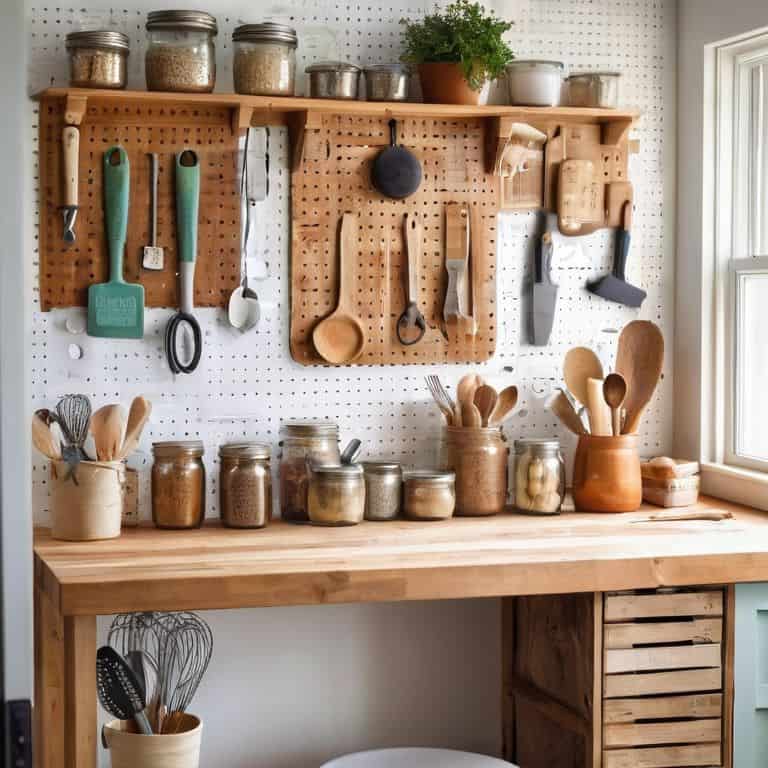
- 6. Next, let’s talk about maximizing your kitchen’s vertical space. One of my favorite DIY hacks is to install a pegboard on a blank wall or the side of a cabinet. This provides a ton of extra storage for items like pots, pans, and cooking utensils, and it’s also a great way to keep your countertops clear. Just be sure to measure your space carefully and choose a pegboard that fits your needs.
- 7. Finally, let’s add some finishing touches to your DIY kitchen organization system. I like to add some decorative elements, like a few potted plants or a kitchen-themed wall art, to make my kitchen feel more warm and inviting. You can also add some functional elements, like a kitchen cart or island, to provide extra counter space and storage. Just remember to have fun and be creative – it’s your kitchen, and it should reflect your personality and style!
Diy Kitchen Organization
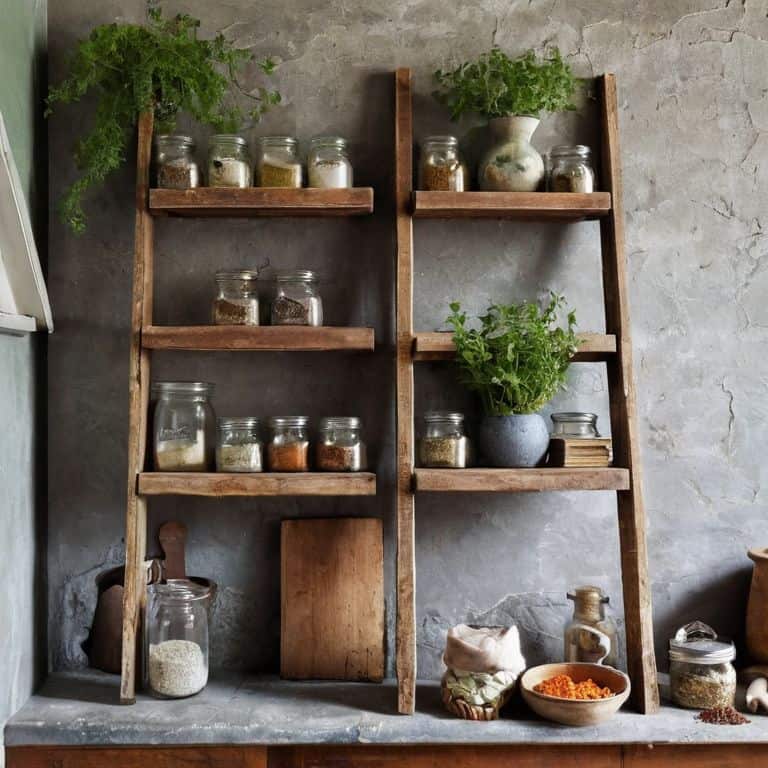
As I delve into the world of DIY kitchen organization, I’ve come to realize that maximizing kitchen storage is all about creativity and resourcefulness. One of my favorite hacks is upcycling old furniture to create custom kitchen shelving ideas that not only save space but also add a touch of personality to the room. For instance, I once transformed an old wooden ladder into a quirky kitchen shelf that now holds my cookbooks and spices.
When it comes to affordable kitchen cart options, I always recommend scouring thrift stores or online marketplaces for second-hand carts that can be easily refurbished with a fresh coat of paint and some new hardware. Not only is this approach budget-friendly, but it also allows you to add a unique twist to your kitchen decor. Additionally, investing in a good kitchen drawer organization system can work wonders in keeping your kitchen clutter-free and making the most of your available space.
In my own tiny kitchen, I’ve learned to appreciate the value of space saving kitchen gadgets that can be easily stowed away when not in use. From compact stand mixers to wall-mounted spice racks, these clever tools have been a game-changer in maintaining a sense of openness and flow in my cooking space. By embracing these practical solutions, you can turn even the smallest kitchen into a functional and beautiful hub of your home.
Affordable Cart Options for Tiny Kitchens
For tiny kitchens, a cart can be a lifesaver, providing extra counter and storage space without breaking the bank. I’ve scoured flea markets and online stores for affordable options that won’t compromise on style. My favorite finds include vintage metal carts, which can be refinished to fit your kitchen’s aesthetic, and IKEA hacks, where you can repurpose their affordable furniture to create a custom cart. With a little creativity, you can score a functional and fashionable cart for under $100.
I recently upcycled an old industrial cart into a kitchen island, adding a butcher block top and some casters for easy mobility. It’s now my go-to spot for food prep and storage, and it cost me less than $50 to make. Whether you’re a DIY novice or a seasoned pro, there are plenty of affordable cart options out there waiting to be discovered and transformed into the perfect addition to your tiny kitchen.
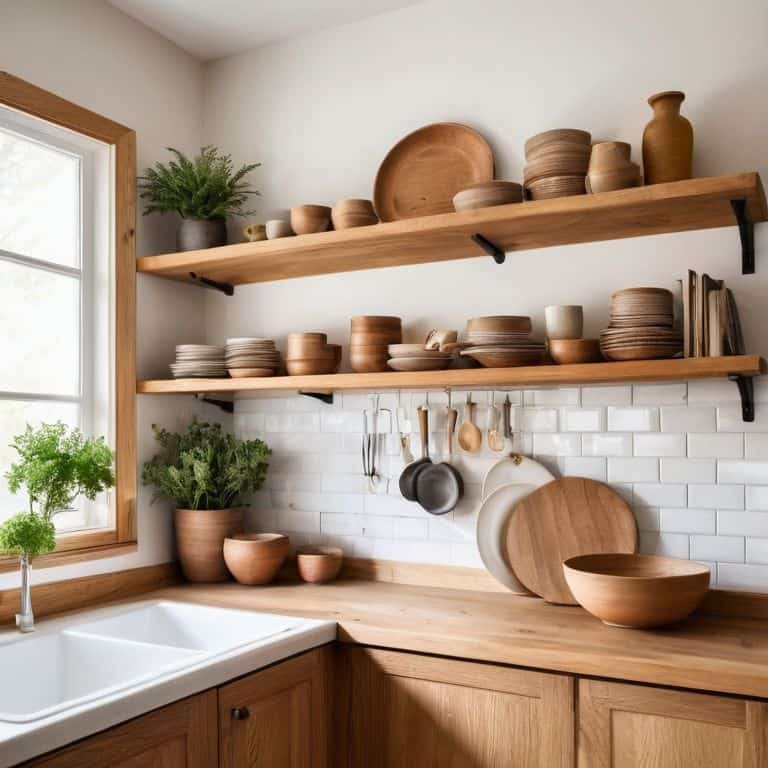
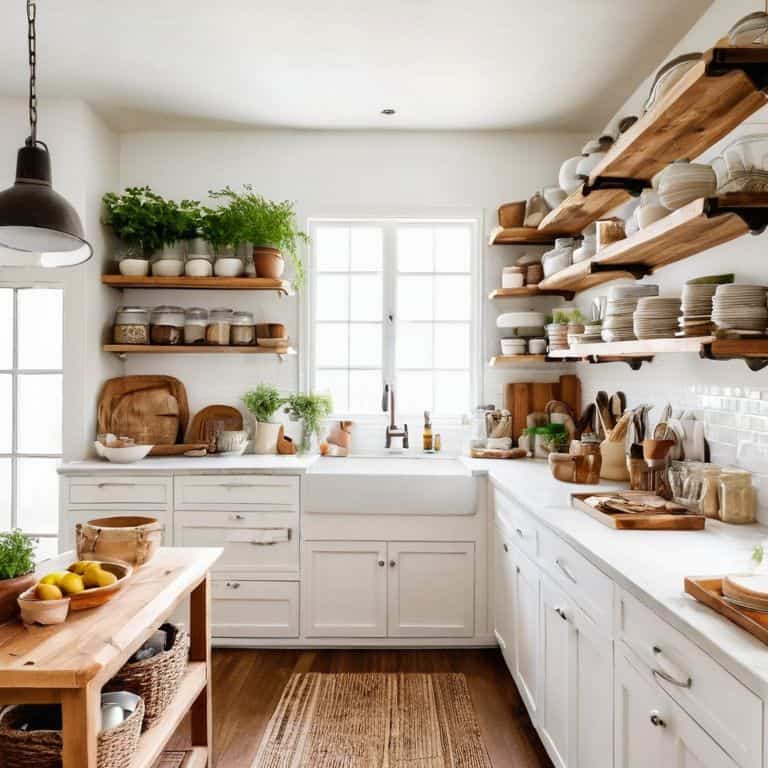
Maximizing Storage With Custom Shelving
Maximizing Storage with Custom Shelving
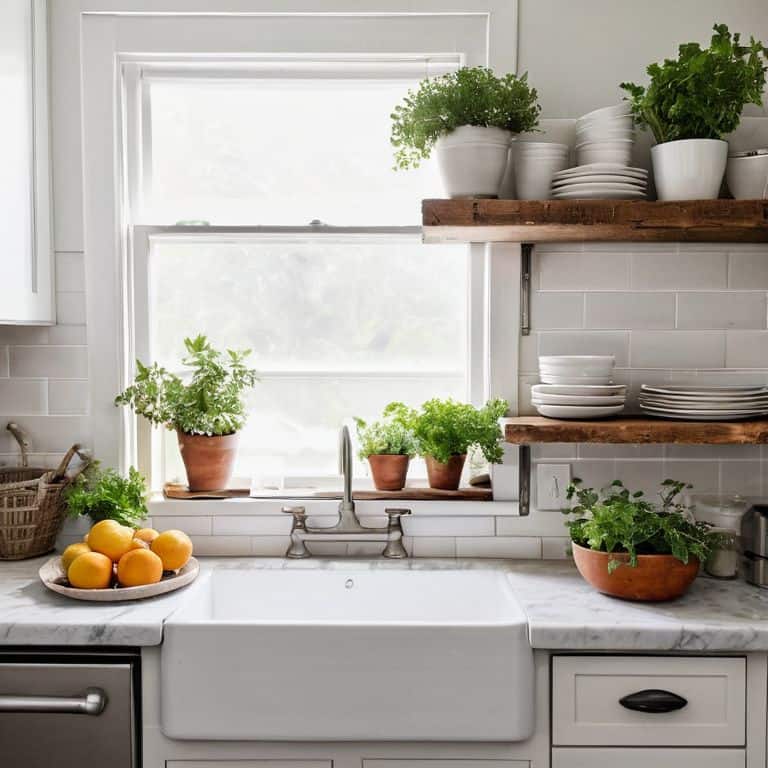
To make the most of my tiny kitchen, I’ve become obsessed with custom shelving solutions. I’ve found that installing shelves above my countertops or near my kitchen window can add a ton of extra storage without taking up too much floor space. Plus, it’s a great way to display my favorite cookbooks, spices, or kitchen gadgets. I like to use reclaimed wood or IKEA hacks to create unique and functional shelves that fit my kitchen’s style.
By adding custom shelving, I’ve been able to free up cabinet space and keep my countertops clutter-free. It’s amazing how much of a difference it’s made in the overall feel of my kitchen. Plus, it’s a great way to add some visual interest and personality to the space. Whether you’re a renter or a homeowner, custom shelving is a DIY-friendly solution that can help you maximize your kitchen’s storage potential.
5 Game-Changing DIY Kitchen Organization Tips to Try Now
- Designate a ‘Junk Drawer’ and Actually Organize It: Let’s face it, every kitchen has that one drawer where everything gets tossed – from takeout menus to spare batteries. Give that drawer a purpose and organize it with DIY dividers or small containers to keep your essentials within easy reach
- Utilize the Back of Your Cabinet Doors: You can never have too much storage in a tiny kitchen, so why not use the back of your cabinet doors? Install some adhesive hooks, a pegboard, or even a spice rack to maximize your space and keep your countertops clear
- Create a ‘Kitchen Station’ for Frequently Used Items: Grouping similar items together, like baking supplies or coffee station essentials, can make your kitchen feel more streamlined and efficient. Use a DIY cart, a tray, or even a vintage crate to create a ‘station’ that keeps your most-used items within easy reach
- Invest in a Magnetic Spice Strip: If you’re like me and have a tiny kitchen with limited cabinet space, a magnetic spice strip can be a total lifesaver. Not only does it keep your spices organized and easy to find, but it also frees up valuable cabinet space for other essentials
- Implement a ‘One In, One Out’ Policy: The key to maintaining a clutter-free kitchen is to be mindful of what you’re bringing into it. Implement a ‘one in, one out’ policy where you get rid of an old item every time you bring a new one into your kitchen – it’s a simple but effective way to keep your space organized and clutter-free
Key Takeaways for a Smarter Kitchen
By applying creative DIY organization solutions, even the smallest kitchens can be transformed into efficient and beautiful spaces that inspire culinary creativity
Custom shelving and affordable cart options can significantly maximize storage and reduce clutter, making the most of limited kitchen real estate
With a few simple tools, like a trusty drill, and some resourceful thinking, anyone can embark on DIY projects that not only solve common kitchen problems but also add a personal touch to their home
Empowering Your Space
The most powerful tool in DIY kitchen organization isn’t a gadget or a gadgetry, it’s your own creativity – learning to see potential in every nook, cranny, and forgotten corner.
Maya Torres
Embracing the Power of DIY Kitchen Organization
As we’ve explored the world of DIY kitchen organization, it’s clear that maximizing storage and creating functional spaces can be achieved with a little creativity and resourcefulness. From custom shelving to affordable cart options, the possibilities are endless, even in the tiniest of kitchens. By applying these DIY solutions, we can turn our kitchens into efficient and beautiful spaces that empower us to cook, create, and connect with others. Whether you’re a seasoned DIY enthusiast or just starting out, the key is to have fun and be willing to experiment with new ideas and materials.
So, the next time you’re faced with a cluttered countertop or a lack of storage, remember that it’s an opportunity to get creative and unleash your inner DIY designer. With a drill in hand and a can-do attitude, you can transform your kitchen into a space that’s not only functional but also truly reflective of your personal style. Don’t be afraid to think outside the box, and most importantly, have fun with the process – after all, that’s what DIY is all about!
Frequently Asked Questions
How can I determine the best layout for my DIY kitchen organization project?
To determine the best layout, start by measuring your kitchen and tracking your workflow – where do you prep, cook, and clean? Identify your ‘zones’ and think about how you can group similar activities together. Sketch out a few ideas, considering your custom shelving and cart placement, to visualize the most functional and beautiful flow for your tiny kitchen.
What are some creative ways to repurpose old furniture or items in my tiny kitchen?
I love breathing new life into old pieces. Try repurposing an vintage dresser as a kitchen island or transforming a wooden ladder into a pot rack. You can also upcycle old mason jars into adorable storage containers or turn a retro side table into a coffee bar. Get creative and give your tiny kitchen a unique personality!
Are there any specific DIY kitchen organization ideas that are suitable for renters or small spaces with limited natural light?
Absolutely, I’ve got some fabulous DIY hacks for renters and small spaces with limited natural light! Consider vertical storage solutions like adhesive hooks or magnetic boards to keep your kitchen tidy without damaging the walls. You can also repurpose old pallets or crates to create custom shelving that adds a touch of warmth to your space.