I still remember the day I decided to ditch my cabinet doors and create an open shelving look in my kitchen. It was a moment of pure liberation, and it completely transformed the way I interact with my tiny cooking space. For years, I’d been struggling with cluttered countertops and a lack of storage, but once I made the switch to open shelving, I realized that it wasn’t just about aesthetics – it was about functionality. I was determined to make my kitchen work for me, not the other way around. As I delved into the world of DIY kitchen makeovers, I discovered that how to create an open shelving look in your kitchen wasn’t just a design choice, but a problem-solving strategy.
In this article, I’ll share my personal experience and expertise on how to create an open shelving look in your kitchen, from planning and design to execution and styling. I’ll walk you through the process of assessing your space, choosing the right materials, and installing your open shelving system. You’ll learn how to maximize storage, minimize clutter, and create a beautiful, functional kitchen that reflects your personal style. Whether you’re a fellow tiny kitchen dweller or just looking to refresh your cooking space, I’ll provide you with honest, no-hype advice and practical tips to help you achieve the open shelving look you’ve always wanted.
Table of Contents
Guide Overview: What You'll Need
Total Time: 4 hours 30 minutes
Estimated Cost: $100 – $300
Difficulty Level: Intermediate
Tools Required
- Drill (with screwdriver and drill bits)
- Level
- Measuring Tape
- Pencil
- Stud Finder
- Saw (circular or handheld)
- Sandpaper (for smoothing out cut edges)
- Paintbrush (for applying finish)
- Ladder (for reaching high shelves)
Supplies & Materials
- 2-in x 4-in lumber (for shelf supports)
- 3/4-in plywood (for shelves)
- Wood screws (for assembling shelves)
- Wall anchors (for securing shelves to wall)
- Wood finish (stain or paint)
- Decorative trim (optional)
Step-by-Step Instructions
- 1. First, assess your kitchen and decide which cabinet or area you want to transform into open shelving. Consider the location, the items you want to display, and how they will be accessed. Take note of the dimensions, as this will help you plan your shelving layout and choose the right materials.
- 2. Next, remove the cabinet doors and any hardware that holds them in place. This is the most straightforward part of the process and will immediately give you a sense of the open shelving look. Set the doors aside; you might be able to repurpose them for another DIY project, like a potting bench or a room divider.
- 3. Now, clean and prepare the area where your new shelves will go. This includes dusting, vacuuming, and possibly painting the wall to match your kitchen’s color scheme. Ensure the surface is smooth and even, as this will affect how your shelves sit and how items are displayed on them.
- 4. Plan your shelving layout by considering the visual balance you want to achieve. Think about the sizes and shapes of the items you’ll be placing on the shelves and how they will be arranged. You might want to create a mock layout on the floor or use cardboard boxes to simulate the shelves before committing to the final design.
- 5. With your plan in place, choose your shelving material. This could be reclaimed wood, metal brackets, or even glass shelves, depending on the look and durability you’re aiming for. Consider factors like weight capacity, ease of installation, and how the material will complement your kitchen’s existing décor.
- 6. Install your shelves according to your plan, starting with the bottom shelf and working your way up. Use a level to ensure each shelf is perfectly horizontally aligned, and secure them well to the wall to prevent them from tipping. If you’re using brackets, now is the time to attach them to the wall and then place your shelves on them.
- 7. Finally, style your shelves with the items you’ve curated. This is where you get to have fun and express your personality through your kitchen decor. Group similar items together, play with heights and textures, and don’t forget to leave some space between items to avoid clutter and maintain that clean, open feel.
Tiny Kitchen Big Style
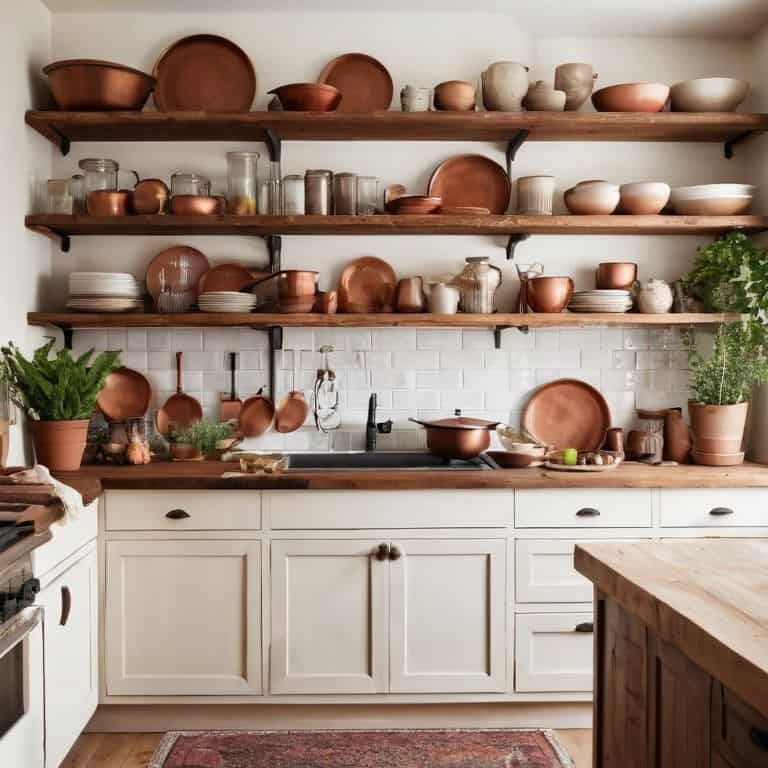
As I always say, a tiny kitchen doesn’t have to mean tiny style. With a little creativity, you can turn your cozy space into a beautiful and functional area that’s perfect for cooking and entertaining. One of my favorite ways to add some personality to a small kitchen is with kitchen shelving ideas on a budget. By repurposing old shelves or finding affordable alternatives, you can create a unique and functional storage solution that adds to the overall aesthetic of your kitchen.
When it comes to designing an open concept kitchen, it’s all about finding the right balance between form and function. You want your space to feel open and airy, but you also need to make sure you have enough storage and counter space to make cooking and cleaning easy. That’s where decorative kitchen storage solutions come in. By using beautiful and functional storage containers, baskets, and shelves, you can keep your kitchen organized and stylish.
For a more rustic look, consider using rustic open shelving to add some warmth and character to your kitchen. This style is perfect for creating a cozy and inviting atmosphere, and it can be easily paired with other decorative elements like vintage appliances and natural textiles. By mixing and matching different styles and materials, you can create a unique and functional kitchen space that reflects your personal taste and style.
Ditch Cabinet Doors for Open Concept
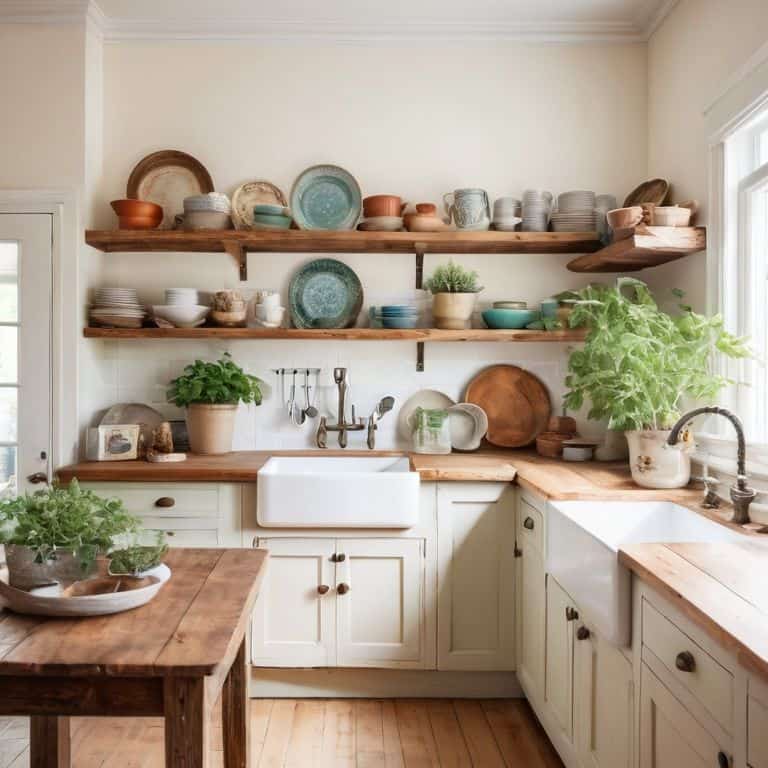
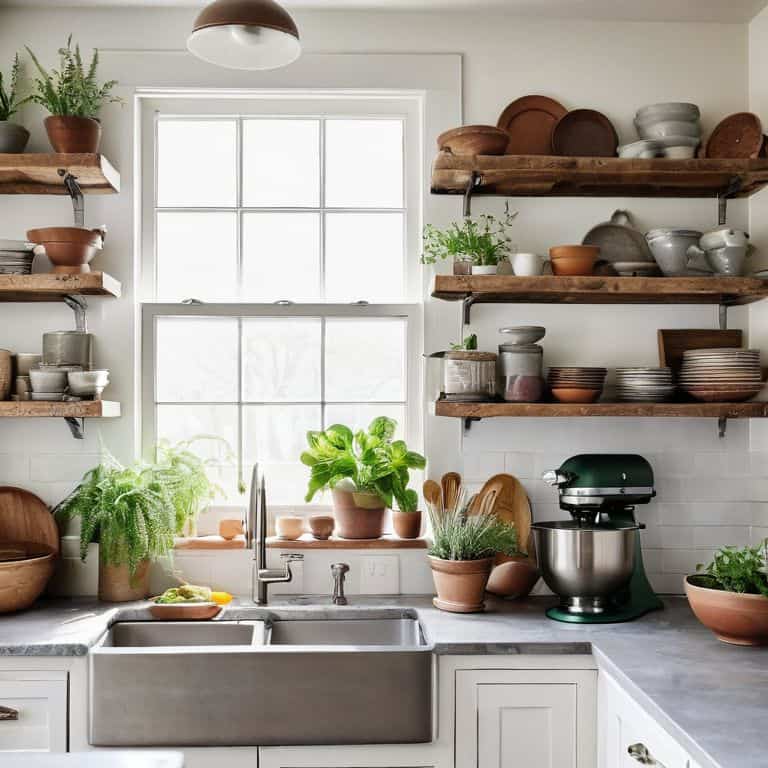
I’m obsessed with the idea of ditching cabinet doors for an open concept look. Not only does it make my tiny kitchen feel more spacious, but it also adds a touch of industrial chic to the whole room. By removing the doors, I can showcase my favorite dishes, glasses, and cookbooks, adding a personal touch to the space. Plus, it’s a great way to keep myself organized – when everything is on display, I’m more inclined to keep my kitchen tidy.
To make this look work, I opted for rustic open shelving made from reclaimed wood. It adds warmth and texture to the room, and the imperfections in the wood give it a unique, one-of-a-kind feel. I found the perfect pieces at a local flea market and upcycled them into the shelves I needed. The result is a beautiful, functional space that’s both stylish and functional.
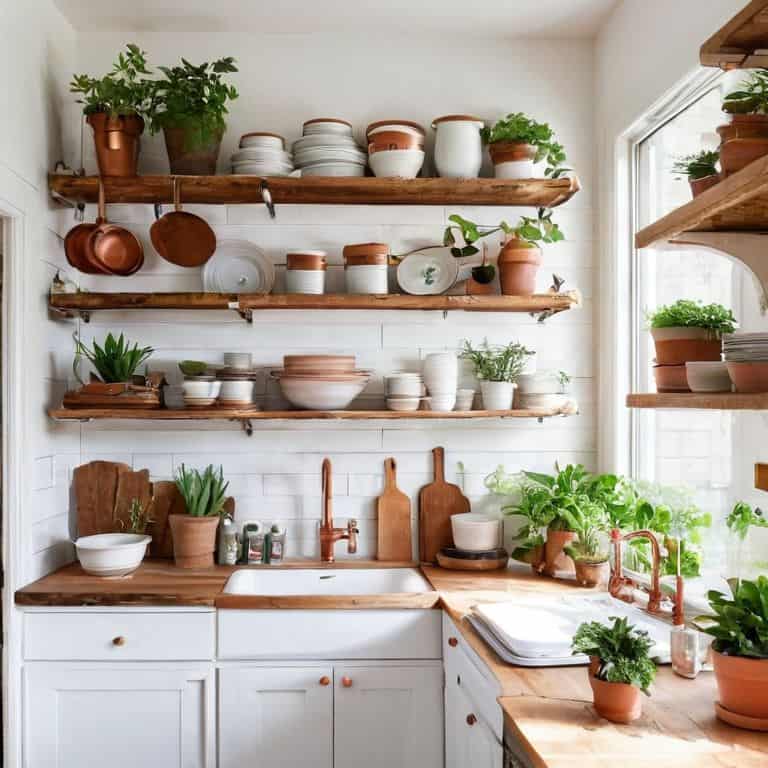
Rustic Open Shelving on Budget
Rustic open shelving can add a touch of warmth to our tiny kitchens without breaking the bank. I’m obsessed with scouring flea markets for old wooden planks or crates that can be repurposed as shelves. With a little sanding and staining, these finds can become one-of-a-kind rustic open shelving units. Plus, they’re often incredibly affordable – I’ve scored amazing pieces for under $20!
To give your rustic open shelving a polished look, try adding some industrial-chic brackets or decorative corbels. You can find these at most hardware stores or home goods shops, and they’re usually easy to install. With a little creativity, you can create a beautiful, functional open shelving system that adds big style to your tiny kitchen – all without blowing your budget!
5 Essential Tips to Nail the Open Shelving Look
- Start by assessing what you already have: Take stock of your kitchen’s existing layout, lighting, and the items you want to display to determine the best spots for your open shelves
- Choose the right materials: From reclaimed wood to sleek metal, select materials that fit your kitchen’s style and are durable enough to hold your dishes, pots, and pans
- Consider the ‘Golden Rule’ of open shelving: Balance decorative items with functional ones to avoid visual clutter and keep your kitchen looking tidy and organized
- Don’t forget about lighting: Add some under-shelf lighting or install LED strips to highlight your beautiful dishes and create a warm ambiance in your kitchen
- Edit and curate your shelves regularly: Open shelving means everything is on display, so make sure to regularly tidy up and rearrange your items to keep your kitchen looking fresh and stylish
3 Key Takeaways for a Stunning Open Shelving Look
Ditching cabinet doors and embracing open shelving can instantly make your tiny kitchen feel more spacious and modern, all without breaking the bank
Repurposing rustic materials or flea market finds can add a unique, personalized touch to your open shelving, reflecting your style and making the space truly yours
By following simple, step-by-step DIY projects, you can achieve a beautiful open shelving look in your kitchen, proving that with a little creativity, small spaces can be both functional and breathtakingly beautiful
Embracing the Open Shelving Revolution
The beauty of open shelving isn’t just about displaying your favorite dishes, it’s about embracing the freedom to curate your space and tell your story, one carefully placed item at a time.
Maya Torres
Embracing the Open Shelving Revolution
As we’ve explored throughout this guide, creating an open shelving look in your kitchen is all about embracing the challenge of small-space living and finding creative solutions to maximize storage and style. From the main step-by-step instructions to the subsections on rustic open shelving on a budget and ditching cabinet doors for an open concept, we’ve covered the essential tips and tricks to help you achieve a beautiful, functional kitchen. By applying these principles, you can turn your tiny kitchen into a haven that’s both aesthetically pleasing and highly functional.
So, don’t be afraid to think outside the box and get creative with your kitchen design. Remember, the key to making open shelving work in a small kitchen is to strike a balance between form and function. With a little bit of imagination and some DIY magic, you can create a kitchen that’s not only a reflection of your personal style but also a testament to the power of resourceful design. Happy building, and don’t forget to share your open shelving creations with me!
Frequently Asked Questions
What are some creative ways to style and arrange items on open shelves to keep my kitchen looking organized and visually appealing?
I love styling my open shelves with a mix of pretty and practical items. Group similar things like cookbooks or vintage jars together, and balance decorative pieces with functional ones like plates or utensils. Don’t forget to leave some breathing room – it’s all about creating a visually appealing balance that makes your kitchen feel cozy and inviting!
How can I ensure that my open shelving is sturdy and secure, especially if I'm renting my home and don't want to make any major renovations?
For renters, I swear by removable adhesive strips and 3M command hooks – they’re sturdy, secure, and won’t damage your walls. You can also opt for freestanding shelves or use decorative brackets that don’t require drilling, keeping your space damage-free and your landlord happy!
What types of materials and finishes are best suited for open shelving in a kitchen, and how can I choose ones that fit my personal style and budget?
For open shelving in my tiny kitchen, I swear by reclaimed wood, industrial pipes, and sleek glass. These materials bring a touch of rustic charm and modern functionality. Consider your personal style: do you love farmhouse, minimalist, or coastal vibes? Choose finishes that fit your aesthetic and budget, like a fresh coat of white paint or a warm wood stain.