I still remember the day I realized that over-the-door storage hacks for a small kitchen weren’t just about cluttering up the back of a door, but about creating a seamless workflow. I was in my own tiny kitchen, struggling to find space for my favorite cooking utensils, when it hit me: the door wasn’t just a barrier, it was an opportunity. By leveraging the often-wasted space behind it, I could streamline my cooking process and make the most of my limited square footage. This epiphany sparked a passion for optimizing my kitchen’s layout, and I’ve been experimenting with innovative over-the-door storage hacks for a small kitchen ever since.
In this article, I’ll share my favorite, battle-tested strategies for transforming the space behind your door into a functional storage hub. You’ll learn how to maximize your kitchen’s vertical space, keep your countertops clear, and make the most of every inch. From cleverly designed storage racks to ingenious hook systems, I’ll walk you through the practical, step-by-step solutions that have revolutionized my own cooking experience. By the end of this guide, you’ll be equipped with the knowledge to supercharge your tiny kitchen’s workflow and make cooking a breeze, no matter how small your space may be.
Table of Contents
- Guide Overview: What You'll Need
- Step-by-Step Instructions
- Turbocharging Tiny Kitchens
- 5 Over-the-Door Hacks to Revolutionize Your Tiny Kitchen
- Key Takeaways for a More Efficient Tiny Kitchen
- The Power of Vertical Space
- Putting it all Together: The Power of Over-the-Door Storage
- Frequently Asked Questions
Guide Overview: What You'll Need
Total Time: 1 hour 45 minutes
Estimated Cost: $20 – $40
Difficulty Level: Easy
Tools Required
- Screwdriver (flathead and Phillips)
- Drill (with wall anchors)
- Level (for proper installation)
- Pencil (for marking walls)
- Measuring Tape (for accurate measurements)
Supplies & Materials
- Over-the-door storage rack
- Adhesive hooks (for hanging items)
- 2-in x 4-in lumber (for shelf support)
- Wood screws (1 inch and 2 inches long)
- Wall anchors (for drywall or plaster)
Step-by-Step Instructions
- 1. First, let’s start by assessing the space behind your kitchen door – it’s essential to understand what you’re working with before you can optimize it. Take a closer look at the door and the surrounding area, considering the type of door, the available wall space, and the location of any obstacles like light switches or electrical outlets.
- 2. Next, gather your materials, which may include over-the-door storage racks, hooks, baskets, or even a pegboard. Think about the items you want to store, such as kitchen utensils, spices, or cleaning supplies, and choose the materials that best fit your needs. I like to use a combination of hooks and baskets to maximize my storage capacity.
- 3. Now it’s time to measure and mark the door and the surrounding wall. Use a tape measure to determine the exact dimensions of your storage space, taking into account any obstructions or irregularities. Mark the spot where you want to install your storage solution, using a pencil or a marker to make a small mark.
- 4. With your measurements in hand, install your storage solution. If you’re using an over-the-door rack, simply hang it over the door and adjust the hooks or bars to fit your items. If you’re using a pegboard, attach it to the wall using screws or adhesive strips, making sure it’s level and secure.
- 5. Once your storage solution is installed, optimize your workflow by organizing your items in a logical and efficient manner. Group similar items together, such as all your kitchen utensils or all your spices, and place them in a way that makes sense for your cooking routine. I like to store my most frequently used items at eye level or near the front of the storage unit.
- 6. To take your storage solution to the next level, consider adding a few accessories, such as baskets, bins, or small containers. These can help keep small items like spices, oils, or cleaning supplies organized and within reach. Look for accessories that fit your storage solution and your kitchen style, and don’t be afraid to get creative.
- 7. Finally, test and refine your storage solution to make sure it’s working for you. Load up your storage unit with your kitchen essentials and see how it holds up. Make any necessary adjustments to the layout or the accessories, and don’t be afraid to try new things or make changes as needed. The key is to create a system that is flexible and adaptable to your changing needs.
Turbocharging Tiny Kitchens

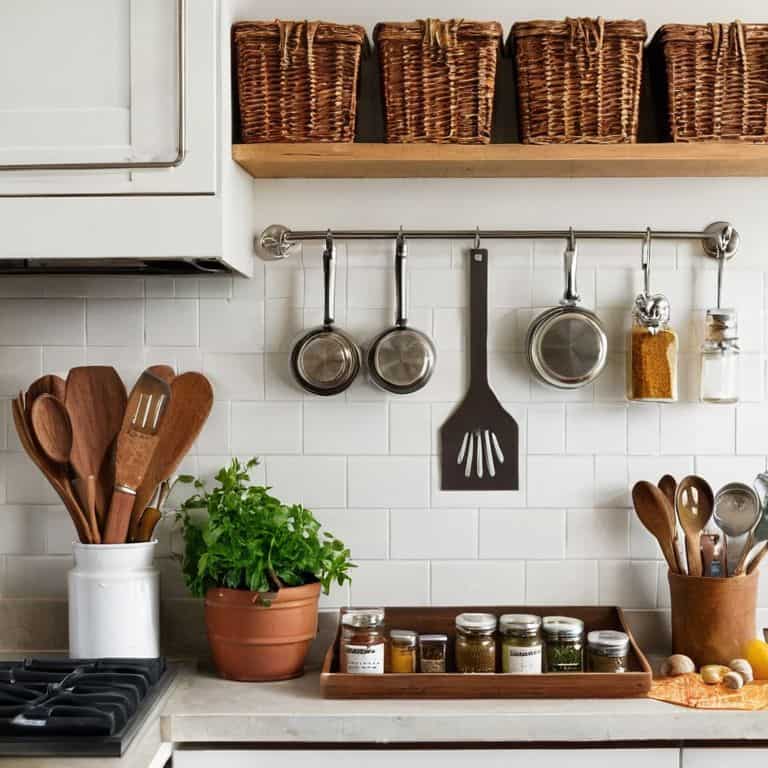
As I continue to optimize my kitchen’s workflow, I’ve discovered that the key to a truly efficient tiny kitchen lies in maximizing every available space. This includes often-overlooked areas like the kitchen corners, where adjustable storage racks can be a game-changer. By installing these racks, I’ve been able to store frequently used items like spices, oils, and cleaning supplies, keeping them within easy reach while maintaining a clutter-free countertop.
One of my favorite hidden kitchen storage ideas is the use of magnetic spice strips on the side of my refrigerator or cabinets. These strips are perfect for storing small metal items like spices, knives, or even kitchen utensils, keeping them organized and out of the way. This simple hack has freed up valuable drawer space and reduced clutter in my kitchen.
To take my kitchen’s functionality to the next level, I’ve also started experimenting with foldable kitchen shelves and behind door shelving units. These space-saving solutions have allowed me to store less frequently used items, like special occasion dishes or cookbooks, while keeping them easily accessible. By implementing these clever storage solutions, I’ve been able to create a kitchen that is not only functional but also surprisingly spacious, despite its tiny footprint.
Maximizing Corner Space With Adjustable Racks
To take my tiny kitchen to the next level, I’ve become fixated on corner spaces – those often-wasted areas that can be leveraged for serious storage gains. Adjustable racks are my go-to solution for maximizing these corners. By installing a sturdy, adjustable rack system, I can customize the layout to fit my specific needs, whether that’s storing spices, oils, or even kitchen utensils.
I love how adjustable racks allow me to make the most of my kitchen’s unique dimensions. With a few simple adjustments, I can create a seamless workflow that keeps my most-used items within easy reach, freeing up valuable counter space and reducing clutter. It’s amazing how such a small tweak can add up to big efficiency gains in a tiny kitchen like mine.
Unlocking Hidden Storage With Magnetic Spice Strips
I’m a huge fan of magnetic spice strips – they’re a total game-changer for tiny kitchens. By attaching these strips to the side of your cabinet or fridge, you can free up a ton of space in your kitchen. I like to use them for spices, oils, and even utensils, keeping them organized and within easy reach. It’s all about creating a workflow that makes sense, and magnetic strips help me do just that.
I’ve experimented with different layouts, and I’ve found that placing the most frequently used items at eye level is key. This way, I can quickly grab what I need without having to dig through cluttered drawers or cabinets. It’s amazing how much of a difference this small tweak can make in the overall efficiency of my kitchen.
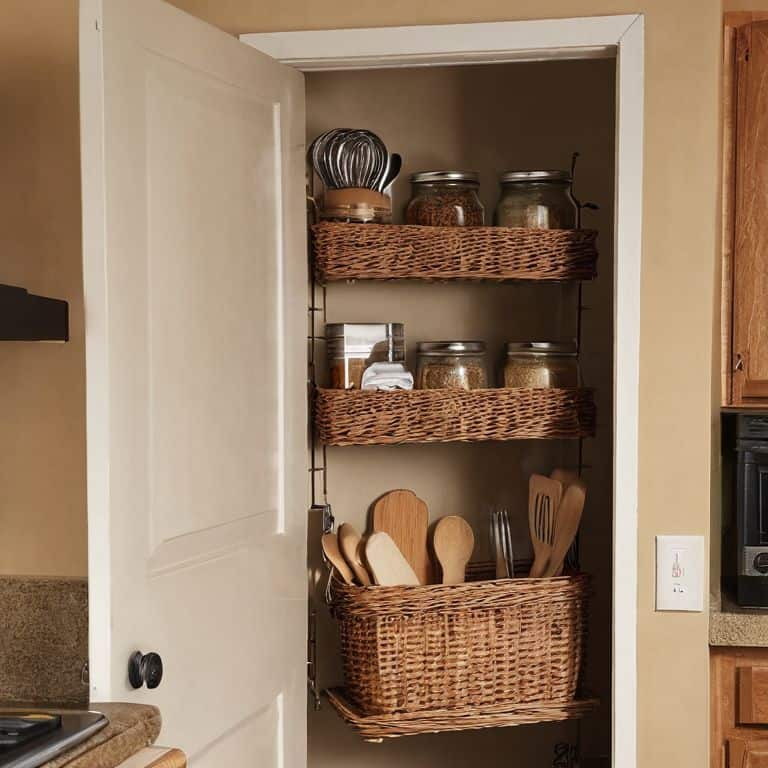
5 Over-the-Door Hacks to Revolutionize Your Tiny Kitchen
- My favorite trick: using adhesive hooks to hang frequently used utensils, keeping them out of the way but still within easy reach
- Installing a shoe organizer on the back of the door can be a game-changer for storing spices, oils, and cleaning supplies
- Repurpose the space above the door with a floating shelf for infrequently used items like special occasion dishes or cookbooks
- Utilize the dead space between the door and the wall with a slim slide-out storage rack for cans, jars, or baking supplies
- Add a tension rod and some S-hooks to create a hanging station for pots, pans, and colanders, freeing up precious cabinet space
Key Takeaways for a More Efficient Tiny Kitchen
I’ve found that optimizing the often-wasted space behind doors can lead to a significant reduction in clutter and increase in workflow efficiency
By implementing adjustable racks in corner spaces and magnetic spice strips, you can unlock hidden storage and create a more streamlined cooking environment
Applying these over-the-door storage hacks and workflow optimizations can transform your tiny kitchen into a highly functional and stress-free space, proving that size is not a limitation to efficiency
The Power of Vertical Space
I’ve found that the key to a stress-free tiny kitchen isn’t about having more space, but about leveraging every inch – and that includes the often-overlooked real estate behind the door, where a few clever over-the-door storage hacks can be the difference between chaos and culinary flow.
Leo Vance
Putting it all Together: The Power of Over-the-Door Storage
As we’ve explored the world of over-the-door storage hacks for small kitchens, it’s clear that with a little creativity and some clever tools, we can significantly increase our storage capacity without sacrificing an inch of floor space. From maximizing corner space with adjustable racks to unlocking hidden storage with magnetic spice strips, each hack builds upon the last to create a kitchen that’s not just functional, but efficient. By applying these principles, you’ll be well on your way to creating a tiny kitchen that works smarter, not harder.
So, the next time you’re staring down at your tiny kitchen, wondering how you’ll ever fit everything in, remember that the key to success lies not in the size of the space, but in the optimized workflow you create within it. With these over-the-door storage hacks and a dash of ingenuity, you can turn even the smallest of kitchens into a culinary powerhouse, where every movement has a purpose and every item has its perfect place.
Frequently Asked Questions
What are some common items that can be stored using over-the-door storage hacks in a small kitchen?
I love this question – it’s all about optimizing that hidden real estate. Common items that shine with over-the-door storage include spices, oils, cleaning supplies, and even kitchen utensils like pots, pans, and colanders. It’s amazing how much clutter you can clear from your countertops by leveraging this often-wasted space.
How can I ensure that my over-the-door storage solutions are securely attached and won't fall off?
To ensure your over-the-door storage solutions stay put, I swear by using heavy-duty adhesive hooks or magnetic strips – they’re like insurance for your kitchen hacks. For extra security, consider adding a few screws or 3M command strips to distribute the weight evenly. Trust me, it’s worth the extra minute to avoid a midnight crash.
Are there any specific materials or designs that work better for over-the-door storage in a small kitchen with limited clearance or narrow doors?
For narrow doors or limited clearance, I swear by slim-profile over-the-door hooks and adhesive strips. They’re perfect for hanging utensils, spices, or bags without obstructing the door’s swing. I’ve also had success with 3D-printed custom hooks that fit snugly over the doorframe, maximizing storage while maintaining a sleek profile.