I still remember the day I realized my tiny kitchen’s utensil drawer had become a black hole of clutter – it was like a puzzle I couldn’t solve. That’s when I embarked on a mission to learn how to make drawer dividers for utensils that would actually work for my small space. The common myth that you need a big budget or a lot of experience to create functional and beautiful kitchen solutions was frustrating, but I was determined to prove it wrong. I started experimenting with different materials and designs, and soon discovered that with a little creativity, anyone can create their own custom dividers.
In this article, I’ll share my honest, no-hype advice on how to make drawer dividers for utensils that will actually keep your kitchen organized. I’ll walk you through a simple, step-by-step process that requires minimal tools and materials, but yields maximum results. You’ll learn how to measure, cut, and assemble your own custom dividers, and how to optimize your kitchen storage without breaking the bank. Whether you’re a fellow small-space dweller or just looking for a practical solution to your kitchen clutter, this guide is for you. Get ready to transform your utensil drawer from a chaos zone to a beautifully organized space that makes cooking and entertaining a breeze.
Table of Contents
Guide Overview: What You'll Need
Total Time: 1 hour 15 minutes
Estimated Cost: $10 – $30
Difficulty Level: Easy
Tools Required
- Table Saw (for cutting lumber)
- Miter Saw (optional for precise cuts)
- Drill (for making pilot holes)
- Screwdriver (for driving screws)
- Measuring Tape (for accurate measurements)
- Square (for ensuring square cuts)
- Sandpaper (for smoothing out wood edges)
Supplies & Materials
- 1/4 inch Thick Plywood (for divider panels)
- 1 inch x 2 inch Lumber (for divider frames)
- Wood Screws (1 inch or 1.5 inches long)
- Wood Glue (for reinforcing joints)
- Sand (for weighting down dividers during glue drying)
- Decorative Trim (optional for finishing touches)
Step-by-Step Instructions
- 1. First, let’s gather our materials – we’ll need some wooden strips (I like to use reclaimed wood from old pallets), a drill, a saw, a measuring tape, and some wood glue. Make sure you have a clear workspace, like a table or countertop, where you can lay out all your tools and materials.
- 2. Next, we need to measure our drawer to determine the size of our dividers. Take your measuring tape and record the length, width, and height of your utensil drawer. Don’t forget to measure the width of the items you want to store, like your favorite kitchen knives or spatulas, to ensure our dividers will accommodate them.
- 3. Now, let’s cut our wooden strips to the right size. Using your saw, carefully cut the wooden strips into the required lengths. Remember to cut a little extra, just in case – we can always trim them down later if needed. Safety first, so make sure you’re wearing protective goggles and a dust mask.
- 4. With our strips cut, it’s time to assemble our dividers. Apply some wood glue to the ends of the strips and attach them to each other, forming the divider walls. Use clamps to hold everything in place while the glue dries. If you’re feeling extra handy, you can use nails or screws for added stability.
- 5. Once our dividers are assembled, we need to attach them to the drawer. This is where our drill comes in handy. Drill some small holes in the bottom of the dividers and the drawer, then use screws to secure them in place. Make sure they’re evenly spaced and sturdy enough to hold all your utensils.
- 6. Now that our dividers are installed, let’s add some finishing touches. Sand down any rough edges, and apply a coat of varnish or paint to protect the wood and give it a nice finish. You can also add some decorative trim or labels to make it look more personalized.
- 7. Finally, let’s test our new dividers and make any necessary adjustments. Fill your drawer with all your utensils and see how they fit. If anything needs tweaking, now’s the time to do it. Take a step back and admire your handiwork – you’ve just created a beautifully organized utensil drawer that’s both functional and visually appealing!
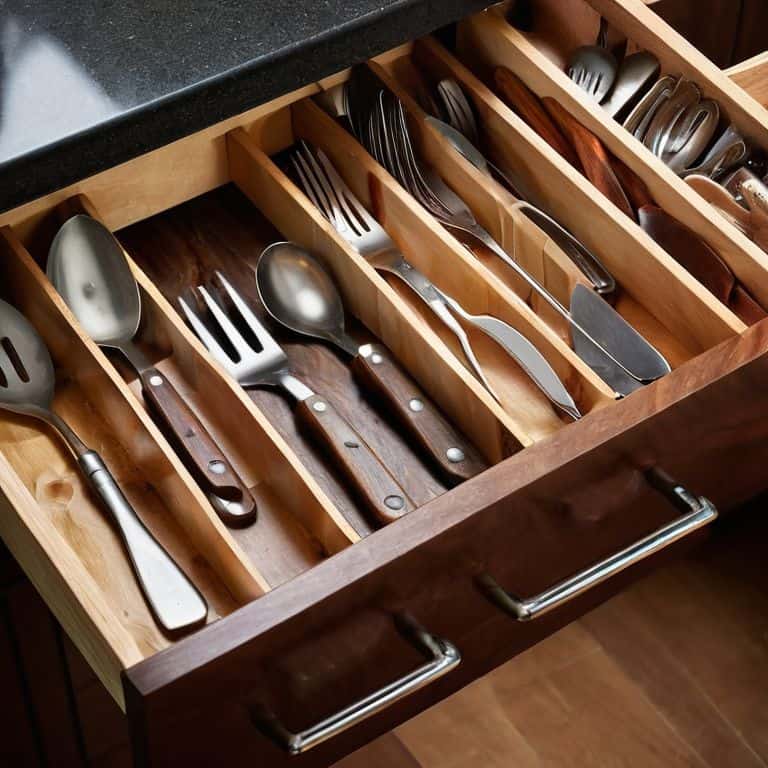
Tiny Kitchen Utensil Hacks
As I’ve learned from my own tiny kitchen adventures, customizable utensil organizer ideas can be a game-changer. One of my favorite hacks is to use a mix of small containers and DIY wooden drawer inserts to create a tailored storage system. This approach allows me to maximize my kitchen drawer space and keep frequently used utensils within easy reach.
In addition to using drawer dividers, I’ve also experimented with adjustable drawer divider systems to accommodate items of different sizes. This has been especially helpful for storing longer utensils, like spatulas and whisks, which often get jumbled up with smaller items. By implementing a combination of these strategies, I’ve been able to create a more efficient and peaceful cooking environment.
For those looking to take their kitchen storage to the next level, I recommend exploring small kitchen storage solutions that incorporate multiple functions. For example, a utensil holder design that also includes a built-in spice rack or knife block can be a great space-saver. By thinking creatively about how to maximize kitchen drawer space, you can create a more organized and functional cooking area that makes meal prep a breeze.
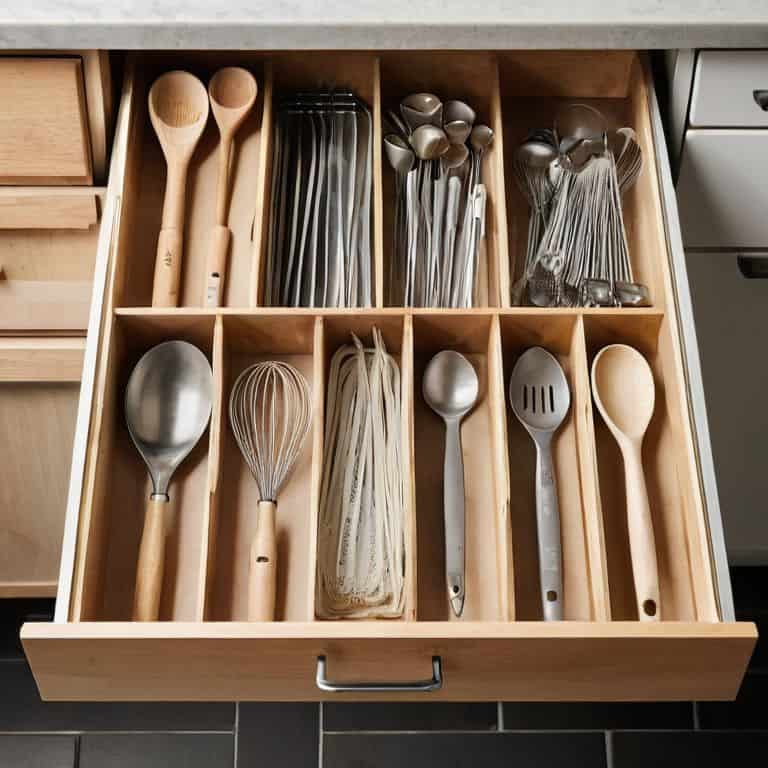
Diy Wooden Drawer Inserts Made Easy
To take your utensil organization to the next level, consider creating DIY wooden drawer inserts. These custom-fit wonders can be made from scrap wood or affordable plywood, making them a budget-friendly solution for small kitchens. With a drill and some basic tools, you can craft inserts that perfectly fit your drawer, keeping utensils tidy and within reach.
I love that these inserts can be tailored to your specific needs – want a special spot for your favorite spatula or a compartment for tiny items like lemon zesters? You got it! The best part? This project requires minimal expertise, so don’t be afraid to get creative and experiment with different designs and materials.
Maximizing Space With Adjustable Dividers
To take our utensil organization to the next level, let’s talk about adjustable dividers. These genius little inserts can be customized to fit any size utensil, from teeny-tiny pastry brushes to bulky serving spoons. By using adjustable dividers, we can create a truly flexible storage system that adapts to our ever-changing kitchen needs. Plus, they’re super easy to install and can be made from materials like wood or plastic.
I love that adjustable dividers allow me to maximize every inch of my tiny kitchen’s storage space. No more wasted gaps between utensils or awkwardly shaped containers – with adjustable dividers, everything fits snugly and neatly in its place. It’s amazing how such a simple solution can make a huge difference in keeping our kitchens clutter-free and functional.
5 Essential Tips for DIY Utensil Drawer Dividers
- Measure Twice, Cut Once: Double-check your drawer dimensions to ensure your dividers fit perfectly, saving you time and frustration
- Choose the Right Material: Select a durable, easy-to-clean material for your dividers, such as wood or plastic, to withstand daily kitchen use
- Keep it Simple, yet Adjustable: Design your dividers with flexibility in mind, allowing you to easily reconfigure them as your kitchen needs change
- Add a Personal Touch: Get creative with your divider design, incorporating personal style or decorative elements to make your kitchen truly unique
- Label and Maintain: Clearly label each divider section and establish a regular cleaning routine to keep your utensil drawer organized and clutter-free
Key Takeaways for a More Organized Tiny Kitchen
By creating custom DIY utensil drawer dividers, you can maximize your kitchen’s storage potential and keep your utensils organized and within easy reach
With a little creativity, materials like wood, plastic, or even repurposed items can be transformed into functional and space-saving drawer inserts
Implementing adjustable dividers and clever hacks can help you make the most of your tiny kitchen, proving that size is just a number when it comes to achieving your dream of a beautifully organized and functional cooking space
Empowering Your Space
The most powerful tool in any tiny kitchen isn’t a gadget, but a DIY mindset – and that starts with something as simple, yet revolutionary, as a handmade drawer divider.
Maya Torres
Bringing it All Together: A More Organized You

As we’ve explored in this guide, creating your own DIY utensil drawer dividers can be a game-changer for tiny kitchens. From the initial steps of measuring and cutting to the final touches of assembling and placing your dividers, every step is a move towards a more organized, more peaceful cooking space. We’ve also touched on some amazing tiny kitchen hacks, including the use of DIY wooden drawer inserts and the genius of adjustable dividers. These tools and techniques not only help in maximizing space but also in minimizing the stress that comes with a cluttered kitchen.
So, as you stand back to admire your newly organized utensil drawer, remember that empowerment comes from taking control of your space. With a drill in hand and a mind full of creativity, you can turn any challenge into an opportunity. Don’t be afraid to experiment, to try new things, and to make your space truly yours. Happy building, and let’s get ready to take on the next DIY project that brings us closer to our dream of a smarter, more beautiful home!
Frequently Asked Questions
What type of materials are best for making durable and long-lasting drawer dividers?
For durable dividers, I swear by solid woods like maple or oak, and thick plywood – they can withstand the chaos of a tiny kitchen. You can also repurpose old pallet wood or MDF for a more budget-friendly option. Just remember, the key is to choose materials that are sturdy, yet easy to work with, and don’t forget to add a finish to protect them from spills and scratches!
Can I customize the size and design of my DIY drawer dividers to fit my specific kitchen utensils and style?
Absolutely, customize away! That’s the beauty of DIY – you can tailor your dividers to fit your unique utensils and kitchen style. Feel free to experiment with different materials, sizes, and designs to create a system that’s perfectly you.
How do I ensure that my homemade drawer dividers are securely in place and won't shift around when I'm opening and closing the drawer?
To keep your homemade dividers in place, try using museum putty or adhesive-backed Velcro strips – they’re gentle on surfaces and provide a snug fit. You can also add a small lip or notch to the divider and corresponding slot in the drawer for an extra-secure fit.