I still remember the day I decided to tackle the chaos in my tiny kitchen – it was all about finding the right answer to what tools do you need to build a pot rack. As a DIY enthusiast living in a small city apartment, I’ve learned that having the right tools can make all the difference between a functional kitchen and a frustrating one. The myth that you need a fancy workshop or a big budget to create a pot rack is just that – a myth. With a few simple, essential tools, you can build a pot rack that will maximize your storage and make cooking a breeze.
In this article, I’ll share my no-nonsense guide to building a pot rack, focusing on the practical tools you’ll need to get the job done. I’ll walk you through the process, step by step, and provide you with honest advice on what you really need to create a beautiful and functional pot rack. Whether you’re a seasoned DIYer or just starting out, this guide is designed to empower you to take control of your kitchen and make the most of your space. So, let’s get started and build a pot rack that will make your tiny kitchen feel like a gourmet chef’s paradise!
Table of Contents
Guide Overview: What You'll Need
Total Time: 2 hours 30 minutes
Estimated Cost: $50 – $100
Difficulty Level: Intermediate
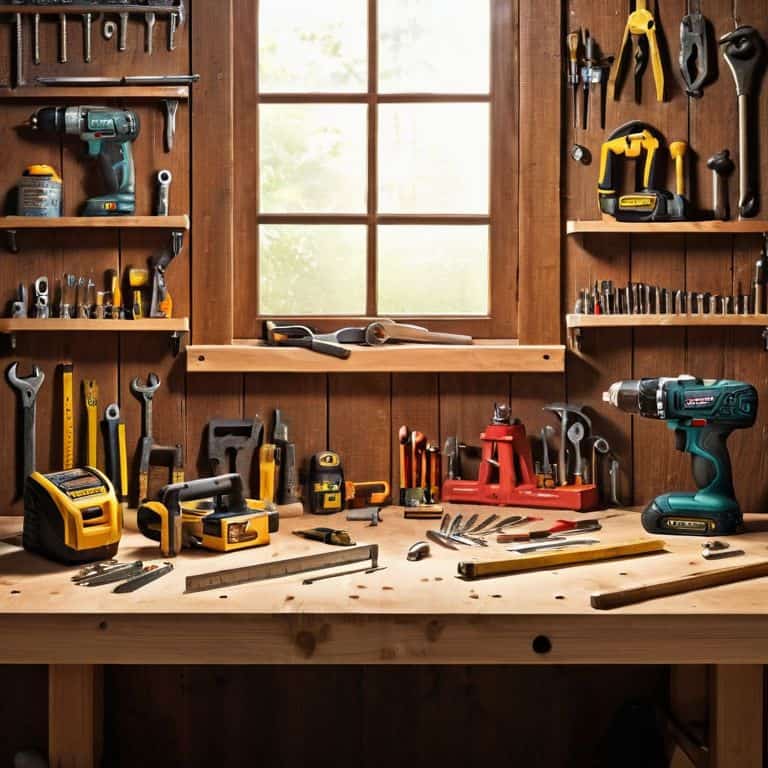
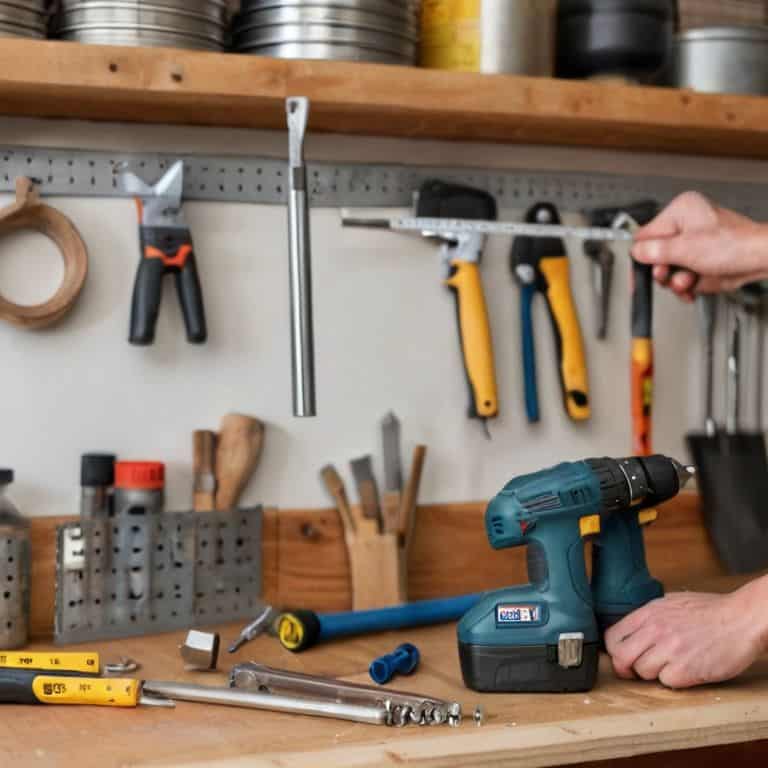
Tools Required
- Drill Press (for precise drilling)
- Hand Saw (or circular saw for cutting wood)
- Sander (for smoothing out wood surfaces)
- Tape Measure (for accurate measurements)
- Level (for ensuring the rack is straight)
- Wrench (for tightening bolts)
- Pliers (for gripping small objects)
- Screwdriver (with flathead and Phillips tips)
Supplies & Materials
- 2-in x 4-in lumber (for the frame)
- 3/4-in plywood (for the shelves)
- Metal rods (for the hanging hooks)
- Wood screws (for assembling the frame)
- Hinges (for the doors or swinging parts)
- Nails (for attaching the back panel)
- Wood glue (for bonding wood pieces)
- Sandpaper (for smoothing out the wood surface)
- Paint or stain (for finishing the pot rack)
Step-by-Step Instructions
- 1. First, let’s talk about the essential tools you’ll need to get started on your DIY pot rack project. You’ll need a drill, which I like to think of as the most empowering tool in your toolbox, a tape measure, a level, and a saw. Don’t worry if you don’t have all of these tools already – they’re easy to find at your local hardware store.
- 2. Next, you’ll need to gather your materials, including the wood or metal you’ll be using for the pot rack itself, as well as any screws, nails, or brackets you’ll need to hold it together. I like to upcycle old wooden pallets or crates for this kind of project, but you can use whatever materials you have on hand. Just make sure they’re sturdy enough to hold the weight of your pots and pans.
- 3. Now it’s time to start building. Begin by measuring the space where you want to install your pot rack, and decide how big you want it to be. You’ll need to take into account the size of your pots and pans, as well as the *clearance you’ll need to be able to easily hang and remove them. Make a sketch or drawing of your design, including all of the measurements, to help guide you as you build.
- 4. With your design in hand, it’s time to start cutting your materials. Use your saw to cut the wood or metal into the required pieces, and then use your drill to make any necessary holes for screws or nails. Don’t forget to wear safety goggles and keep your work area clean and clear of clutter.
- 5. Once you have all of your pieces cut and ready to go, it’s time to start assembling your pot rack. Use your screws, nails, or brackets to hold everything together, and make sure it’s level and secure before you start hanging your pots and pans. You may want to enlist the help of a friend or family member to hold things in place while you work.
- 6. With your pot rack assembled, it’s time to install it in your kitchen. Use your drill to make any necessary holes in the wall, and then screw or nail your pot rack into place. Make sure it’s securely attached to the wall, and that it can hold the weight of all of your pots and pans.
- 7. Finally, it’s time to add the finishing touches to your pot rack. You can add a coat of paint or stain to match your kitchen decor, or leave it plain for a more rustic look. You can also add any additional features, such as a hanging bar for utensils or a hook for your kitchen towels.
What Tools Do You Need
When it comes to diy pot rack plans, having the right tools can make all the difference. I’ve learned this from experience, as I’ve spent countless hours scouring flea markets for unique materials to upcycle into functional pieces for my tiny kitchen. For a pot rack project, you’ll want to start with a good drill – I like to think of it as the ultimate empowering tool. A reliable drill will help you make precise holes for your screws and ensure a sturdy build.
As you gather your tools, don’t forget to consider the pot rack materials list. You’ll need a mix of wood, screws, and potentially some chain or rope for a hanging pot rack installation. I like to keep a ‘scrap wood’ collection on hand for projects like this, as it can help reduce waste and add a touch of personality to your finished product. When selecting your materials, think about the overall aesthetic you want to achieve – do you want a rustic, industrial look or something more sleek and modern?
For a wall mounted pot rack, you’ll also want to invest in a level and a stud finder to ensure a secure installation. And don’t forget about adjustable pot rack designs – these can be a game-changer for small kitchens, as they allow you to customize your storage to fit your specific needs. By choosing the right tools and materials, you’ll be well on your way to creating a beautiful and functional pot rack that will make the most of your tiny kitchen’s space.
Diy Pot Rack Plans Uncovered
Now that we’ve covered the essentials, let’s dive into the nitty-gritty of DIY pot rack plans. I’ve found that a good plan is all about balancing form and function. For my own tiny kitchen, I opted for a wall-mounted rack to save floor space. You can choose from a variety of materials like wood, metal, or even repurposed pallets. Consider the size of your pots and pans, as well as the style of your kitchen, to ensure your rack fits seamlessly into the space.
When creating your plan, think about the type of hooks or hangers you’ll need, and whether you want to add any extra features like a spice rack or utensil holder. Don’t be afraid to get creative and experiment with different designs until you find one that works for you. With a solid plan in place, you’ll be well on your way to a beautiful and functional pot rack that makes the most of your tiny kitchen.
Essential Pot Rack Materials List
Now that we’ve covered the tools, let’s talk about the materials you’ll need to bring your pot rack to life. I’m all about keeping things budget-friendly and accessible, so don’t worry if you’re working with a small budget. For this project, you’ll need some wooden dowels, metal hooks, and a few screws. You can find these at your local hardware store or even repurpose some items you have lying around the house. I love getting creative with materials and finding new uses for old things.
My scrap wood collection has come in handy more times than I can count, and I’m sure you’ll find that you have some hidden gems in your own home. Some other essentials include a drill press, sandpaper, and a hammer. Don’t worry if you don’t have all of these on hand – you can always borrow from a friend or pick them up at a thrift store. The key is to keep it simple and have fun with the process. With these materials, you’ll be well on your way to creating a pot rack that’s both functional and beautiful.
5 Essential Tips for Your DIY Pot Rack Toolbox
- Start with the basics: a drill, a tape measure, and a level will be your new best friends in this project
- Invest in a good-quality saw, whether it’s a handheld or a stationary one, to make clean cuts through wood and metal
- Don’t underestimate the power of a good wrench set – it’ll come in handy when tightening those pesky pot rack screws
- A pencil and a marker are must-haves for marking your measurements and making adjustments on the fly
- Lastly, don’t forget safety goggles and a dust mask to protect yourself from debris and dust while you’re building your pot rack masterpiece
3 Key Takeaways for a Successful DIY Pot Rack
By investing in a few essential tools and materials, you can create a functional and beautiful pot rack that maximizes storage in your tiny kitchen
With a little creativity and resourcefulness, you can build a custom pot rack that fits your unique space and style, without breaking the bank
Whether you’re a seasoned DIY enthusiast or a beginner, this project is achievable and empowering, and can be completed with basic tools and materials, making it perfect for renters and small-space dwellers
The Right Tools for the Job
A drill is not just a power tool, it’s a key to unlocking your kitchen’s full potential – with it, you can turn any corner into a culinary command center, and that’s the most empowering feeling of all!
Maya Torres
Empowering Your DIY Journey

As we wrap up our exploration of the essential tools needed to build a pot rack, let’s take a moment to reflect on the journey. We’ve covered the must-haves, from drills to hammers, and dived into the world of DIY pot rack plans and materials. The key takeaway is that with the right tools and a bit of creativity, you can create a functional and beautiful pot rack that enhances your tiny kitchen. Remember, the goal is not just about maximizing storage but also about making your space truly yours.
So, as you embark on your DIY adventure, keep in mind that it’s not just about the tools or the materials – it’s about the empowerment that comes with creation. Every screw you drive, every plank you cut, is a testament to your ability to transform your space into a haven that reflects your personality and style. Don’t be afraid to experiment, to try new things, and to make mistakes – they’re all part of the beautiful process of turning your house into a home.
Frequently Asked Questions
What are the must-have power tools for building a sturdy pot rack?
For a sturdy pot rack, I swear by my trusty drill and impact driver – they’re the dynamic duo of DIY! A circular saw or jigsaw also come in handy for cutting wood to size. And, of course, a sander to smooth out those edges. These power tools will help you build a pot rack that’s both functional and beautiful.
Can I use any type of drill bits for the pot rack project or are there specific ones recommended?
Not all drill bits are created equal for this project. I recommend using sharp, twist drill bits for drilling into metal and wood. For screwing into wood, a trusty Phillips head or flathead bit will do the trick. Don’t forget to choose the right size to match your screws – it makes all the difference in a sturdy pot rack.
Are there any alternative tools I can use if I don't have a miter saw for precise cuts?
No miter saw? No problem. You can use a circular saw or even a hand saw for precise cuts. If you’re feeling extra crafty, try a miter box with a hand saw for super accurate angles. I’ve done it, and it works like a charm!