I still remember the first time I stepped into my tiny kitchen, feeling like I was staring into a puzzle with no clear solution. The question echoing in my mind was: how to use vertical space in a small kitchen without making it look cluttered or compromising on functionality? It’s a challenge many of us face, and the common myth is that vertical space is only for large kitchens or those with exceptionally high ceilings. However, the truth is, with the right strategies, even the smallest of kitchens can benefit from clever vertical space utilization.
In this guide, I promise to share my practical and tested methods for transforming your small kitchen into a workflow haven. You’ll learn how to identify and capitalize on the often-overlooked vertical spaces, from the walls to the ceilings, and turn them into efficient storage and organizational areas. By the end of this article, you’ll have a clear understanding of how to apply these principles to your own kitchen, making the most of every inch and creating a cooking space that is not only functional but also enjoyable to be in. Whether you’re a culinary enthusiast or just looking to make your kitchen life easier, this guide is designed to provide you with the insights and tools needed to maximize your kitchen’s potential.
Table of Contents
- Guide Overview: What You'll Need
- Step-by-Step Instructions
- How to Use Vertical Space in a Small Kitchen
- 5 Game-Changing Tips to Unlock Your Small Kitchen's Vertical Potential
- Key Takeaways for a Vertically Optimized Kitchen
- Unlocking Vertical Potential
- Unlocking the Full Potential of Your Tiny Kitchen
- Frequently Asked Questions
Guide Overview: What You'll Need
Total Time: 2 hours 30 minutes
Estimated Cost: $50 – $100
Difficulty Level: Intermediate
Tools Required
- Drill (with screwdriver and drill bits)
- Level (to ensure proper installation)
- Measuring Tape (for accurate measurements)
- Pencil and Marker (for marking walls and surfaces)
- Stud Finder (to locate wall studs)
- Ladder or Step Stool (for safe access to high areas)
Supplies & Materials
- Shelving Units or Brackets (made of metal, wood, or plastic)
- Wall Anchors or Screws (for securing shelves to walls)
- Plywood or Medium-Density Fiberboard (for custom shelving or storage solutions)
- Decorative Trim or Molding (for finishing edges and corners)
- Paint or Stain (for matching the color of the shelves to the kitchen decor)
Step-by-Step Instructions
- 1. First, let’s assess the layout of your small kitchen to identify the areas where you can optimize vertical space. Take a closer look at your walls, corners, and the space between your countertops and ceiling. Consider the workflow patterns you use most often in your kitchen, such as where you stand to cook, where you store your utensils, and where you place your ingredients.
- 2. Next, measure your space carefully to determine the maximum potential for vertical storage. Use a tape measure to record the dimensions of your walls, the distance between your shelves (if you already have any), and the height of your ceiling. This will help you decide on the most suitable storage solutions for your kitchen, such as wall-mounted shelves, hooks, or a pegboard.
- 3. Now, let’s talk about maximizing corner space, which is often underutilized in small kitchens. You can install corner shelves, a carousel, or a lazy Susan to make the most of this area. Consider the items you use most frequently and store them in easy-to-reach locations, while reserving the higher or lower shelves for less frequently used items.
- 4. To make the most of your kitchen’s vertical space, consider investing in wall-mounted storage solutions such as pots and pans racks, spice racks, or utensil holders. These will not only keep your countertops clear but also add a touch of visual organization to your kitchen. Choose solutions that are sturdy, easy to install, and fit your kitchen’s style.
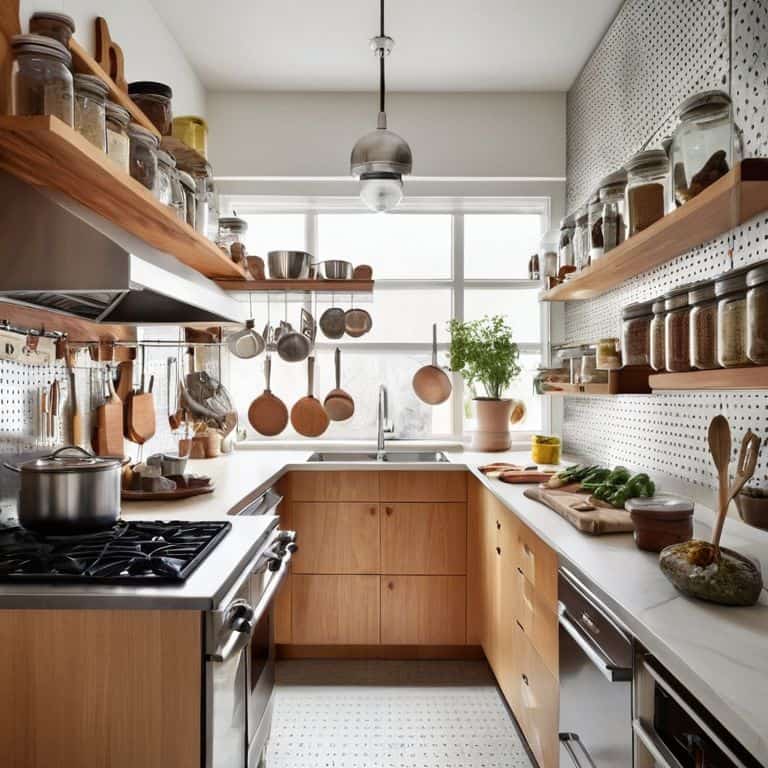
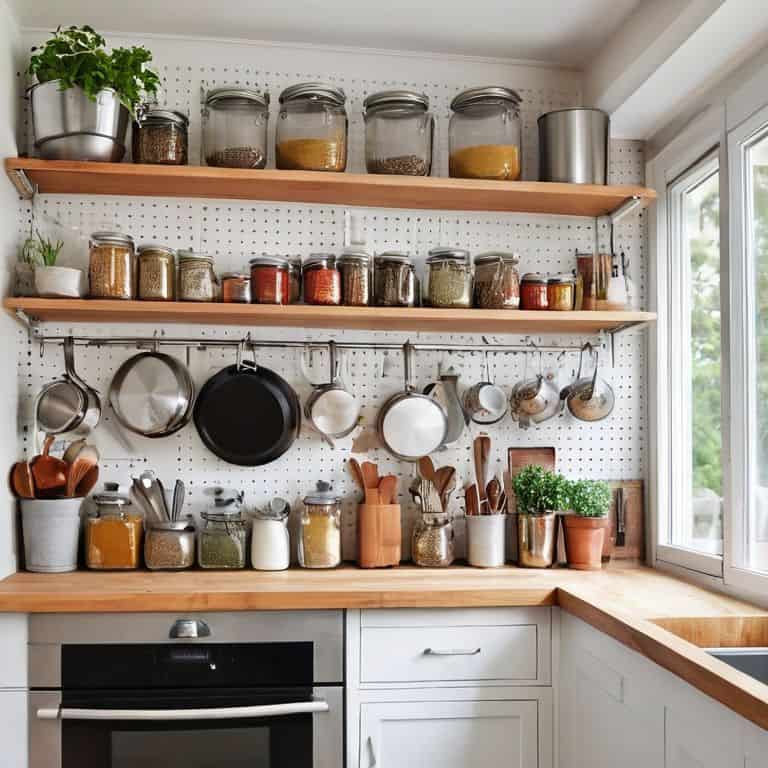
- 5. Another clever way to use vertical space in your small kitchen is to install a pegboard on one of your walls. This will provide you with a versatile and customizable storage system for your utensils, gadgets, and other kitchen tools. You can hang items such as pots, pans, colanders, and even your kitchen accessories like stand mixers or blenders.
- 6. If you have a narrow kitchen, consider using tall, thin storage units that can fit snugly between your countertops and the wall. These can be used to store canned goods, spices, or other dry ingredients, keeping them organized and within reach. Look for units with adjustable shelves to accommodate items of different sizes.
- 7. Finally, don’t forget to make the most of the space above your kitchen door or windows. You can install a high shelf or a storage rack to store infrequently used items such as special occasion dishes, cookbooks, or kitchen gadgets. This will not only free up space elsewhere in your kitchen but also keep these items dust-free and out of the way.
How to Use Vertical Space in a Small Kitchen

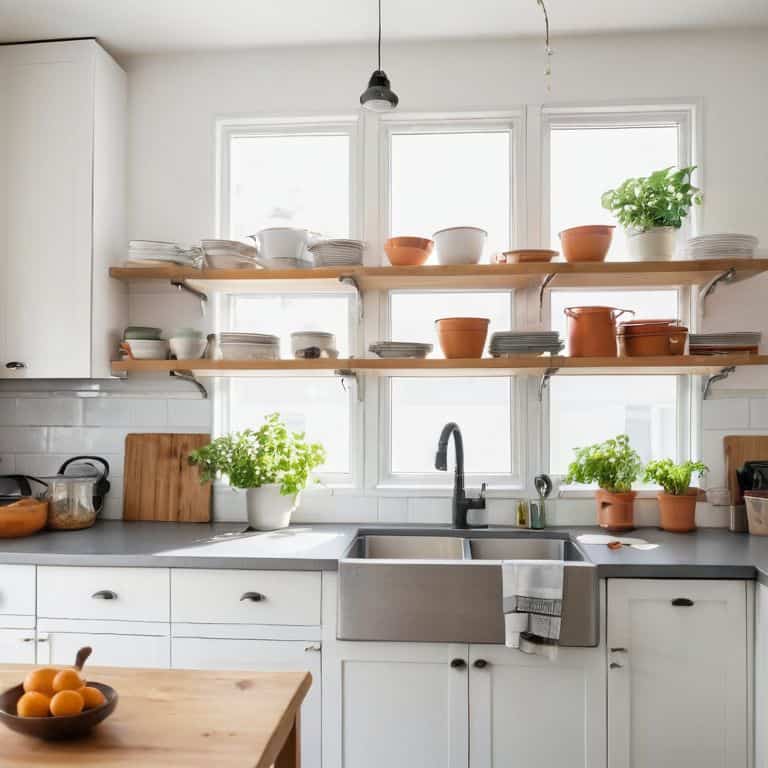
When it comes to maximizing kitchen storage, I always look for opportunities to utilize the often-wasted space above my countertops. One of my favorite hacks is to install adhesive wall hooks for hanging frequently used items like pots, pans, and utensils. Not only does this free up cabinet space, but it also keeps my most-used items within easy reach.
To take it to the next level, I recommend experimenting with optimal shelf height to ensure that your most frequently used items are easily accessible. For me, this means placing my go-to spices and oils on a lower shelf, while reserving the higher shelves for less frequently used items. This workflow optimization technique has been a game-changer in my own tiny kitchen, allowing me to move more efficiently and focus on the cooking process.
In addition to shelves and hooks, I’m also a big fan of corner kitchen cabinet solutions that make the most of those notoriously tricky corners. By installing a cleverly designed corner carousel or lazy Susan, you can turn a formerly dead space into a functional storage hub. This, combined with the use of hanging pot lid organizers, can help keep your kitchen feeling more streamlined and organized, even in the smallest of spaces.
Cracking the Code Maximizing Kitchen Storage
To truly maximize kitchen storage, it’s essential to think beyond traditional shelving. I’m a big fan of installing pegboards on the backs of doors or on unused walls, where I can hang frequently used utensils and tools. This not only keeps them within easy reach but also frees up valuable drawer and countertop space. By assigning a specific spot for each item, I can ensure that everything has its place and can be quickly retrieved when needed.
By implementing a few clever storage solutions like these, you can significantly boost your kitchen’s functionality and efficiency. Remember, the key to success lies in careful planning and a willingness to think outside the box – or in this case, the kitchen cabinet!
Solving the Puzzle Optimal Shelf Height Strategies
To solve the puzzle of vertical space, I’ve found that optimal shelf height is crucial. In my own tiny kitchen, I’ve implemented a “zone-based” approach, where shelves are strategically placed to accommodate frequently used items. For instance, my most-used spices and oils are stored on a shelf just above my countertop, within easy reach. Less frequently used items, like special occasion dishes, are relegated to higher or lower shelves.
By carefully considering the items you use most and placing them at optimal heights, you can create a workflow that’s both efficient and ergonomic. I’ve even created a simple diagram to help me visualize my shelf layout and ensure that every item has a designated “home” – it’s amazing how much of a difference this can make in a small kitchen!
5 Game-Changing Tips to Unlock Your Small Kitchen's Vertical Potential
- Start by mapping your kitchen’s vertical zones: divide your walls into areas for high-use, medium-use, and low-use items to optimize your storage and minimize clutter
- Choose your wall-mounted storage wisely: install a pegboard for frequently used utensils, a magnetic strip for spices, and a foldable shelf for occasional items to keep your countertops clear
- Implement a ‘first in, last out’ rule for your shelves: place your least frequently used items towards the top and your most used items at eye-level to reduce stretching and straining
- Maximize your corner space with custom 3D-printed or store-bought units: these can be used to store specialized kitchen tools, such as stand mixers or food processors, keeping them out of the way but still accessible
- Consider investing in a ceiling-mounted pot rack: this will not only free up cabinet space but also add a touch of industrial chic to your kitchen, making the most of your vertical space while keeping your cookware organized and within reach
Key Takeaways for a Vertically Optimized Kitchen
By applying the principles of workflow and efficiency, you can transform your small kitchen into a highly functional space that rivals larger kitchens in terms of productivity
Implementing smart storage solutions and optimizing shelf heights are crucial strategies for maximizing vertical space and reducing clutter in your kitchen
Through careful planning and the use of custom storage solutions, such as 3D printed organizers, you can create a kitchen workflow that is both efficient and enjoyable to use, making cooking and meal prep a breeze
Unlocking Vertical Potential
The key to unlocking your small kitchen’s true potential lies not in its footprint, but in its vertical landscape – by harnessing the power of walls, ceilings, and clever design, you can turn even the most compact space into a culinary command center.
Leo Vance
Unlocking the Full Potential of Your Tiny Kitchen
As we’ve explored the world of vertical space in small kitchens, it’s clear that maximizing storage and _optimal shelf height strategies_ are crucial to creating a functional and efficient cooking environment. By applying these principles, you can transform your tiny kitchen into a _workflow wonderland_, where every movement has a purpose and every inch counts. From installing wall-mounted shelves to utilizing ceiling-mounted pots and pans holders, the possibilities are endless. The key is to think creatively and focus on solving the puzzle of your unique kitchen layout.
As you embark on your own tiny kitchen optimization journey, remember that it’s all about _cracking the code_ to unlock the full potential of your space. Don’t be afraid to experiment, try new things, and push the boundaries of what’s possible. With a little bit of creativity and a lot of logical thinking, you can turn even the smallest kitchen into a culinary haven that’s both beautiful and functional. So, go ahead, get creative, and make the most of that vertical space – your inner chef (and your kitchen) will thank you!
Frequently Asked Questions
How can I determine the ideal shelf height for my specific kitchen needs?
To determine ideal shelf height, I recommend a ‘reach test’: place items where they’ll be stored, then adjust shelves to fit your most-used items at a comfortable height, usually between waist and chest level, for easy access and minimal strain.
What types of items should I prioritize storing in hard-to-reach vertical spaces?
For those hard-to-reach vertical spaces, I recommend storing items you don’t use daily, like special occasion dishes, infrequently used cookbooks, or out-of-season kitchen gadgets. This keeps them out of the way while maintaining easy access to your everyday essentials.
Are there any creative ways to use the space above my kitchen cabinets or on the backs of doors?
I love exploiting those overlooked areas. Above your cabinets, consider a pegboard for hanging infrequently used items or a fold-down shelf for extra counter space. On the backs of doors, install a spice rack, hook for hanging utensils, or a magnetic board for notes and recipes. It’s all about finding that hidden potential.