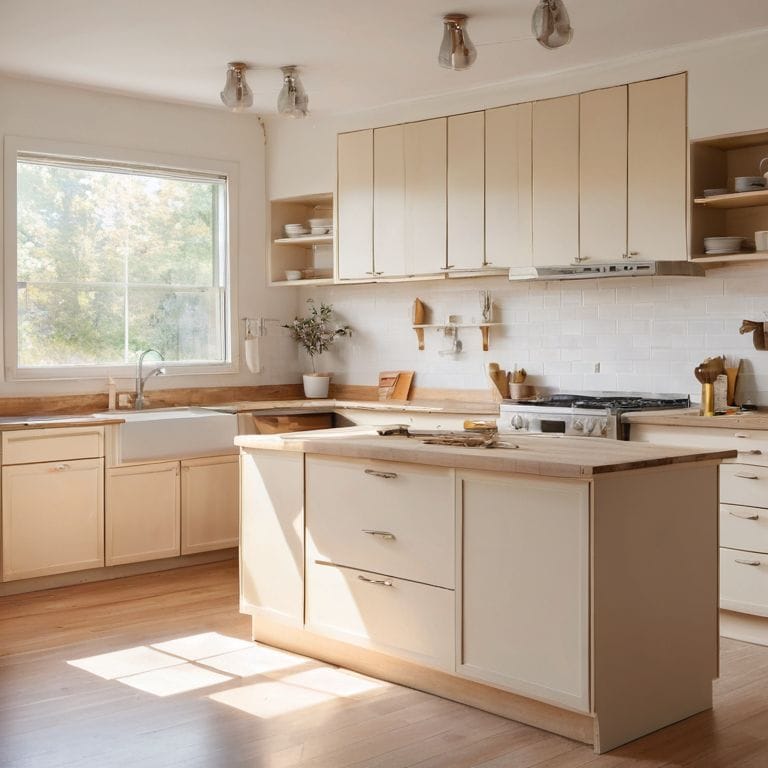
I still remember the day I decided to take on my tiny kitchen’s outdated laminate cabinets. A friend told me it was a lost cause, that painting laminate cabinets was a recipe for disaster. But I was determined to prove them wrong, and that’s exactly what I did. With the right tools and a bit of creativity, I transformed my drab, cookie-cutter cabinets into a stunning focal point of my kitchen. If you’re like me and refuse to let a small space hold you back, then you’re in the right place. I’m excited to share my journey and provide you with a guide to painting laminate cabinets that will empower you to do the same.
In this article, I’ll cut through the noise and share my honest, tried-and-tested tips for painting laminate cabinets. You won’t find any fancy, expensive solutions here – just practical, budget-friendly advice that’s perfect for small-space dwellers like us. I’ll walk you through the entire process, from preparation to completion, and provide you with the confidence to tackle this project on your own. By the end of this guide, you’ll be equipped with the knowledge to turn your own lackluster cabinets into a beautiful, functional masterpiece that reflects your personal style. So, let’s get started and give your kitchen the makeover it deserves!
Table of Contents
- Guide Overview: What You'll Need
- Step-by-Step Instructions
- A Guide to Painting Laminate Cabinets
- My Top 5 Tips for a Flawless Laminate Cabinet Paint Job
- My Top 3 Takeaways for a Successful Laminate Cabinet Paint Job
- Painting Laminate Cabinets: A Game-Changer
- Bringing Your Vision to Life
- Frequently Asked Questions
Guide Overview: What You'll Need
Total Time: 2 days to 1 week
Estimated Cost: $50 – $200
Difficulty Level: Intermediate
Tools Required
- Sandpaper (various grits)
- Paintbrushes (1 inch, 2 inch, and 4 inch wide)
- Roller Extension Pole (for large surfaces)
- Paint Tray
- Drop Cloths (for protecting floors and countertops)
- Masking Tape (for edges and trim)
- Primer Spray (optional)
- Cleaning Rags
Supplies & Materials
- Laminate Primer (specifically designed for laminate surfaces)
- Cabinet Paint (choose a color and finish)
- Clear Coat (optional for added protection)
- Wood Filler (for filling any holes or gaps)
- Light-Grit Sanding Block (6 inches long)
Step-by-Step Instructions
- 1. First, prepare your space by clearing out everything from your cabinets and covering your countertops, floors, and any surrounding areas with drop cloths or plastic sheets. This will protect them from any paint spills or stains. Make sure you have good ventilation in your kitchen by opening windows or using a fan.
- 2. Next, remove the hardware from your cabinets, including knobs, handles, and hinges. Set them aside in a safe place where they won’t get lost. This will give you a smooth surface to paint and prevent any paint from getting stuck in the small crevices of the hardware.
- 3. Now, clean the cabinets thoroughly with a degreaser to remove any grease, grime, or food residue. This is an important step because laminate surfaces can be quite slippery, and the paint won’t adhere well if the surface is dirty. Use a soft cloth to wipe down the cabinets, and let them dry completely before moving on to the next step.
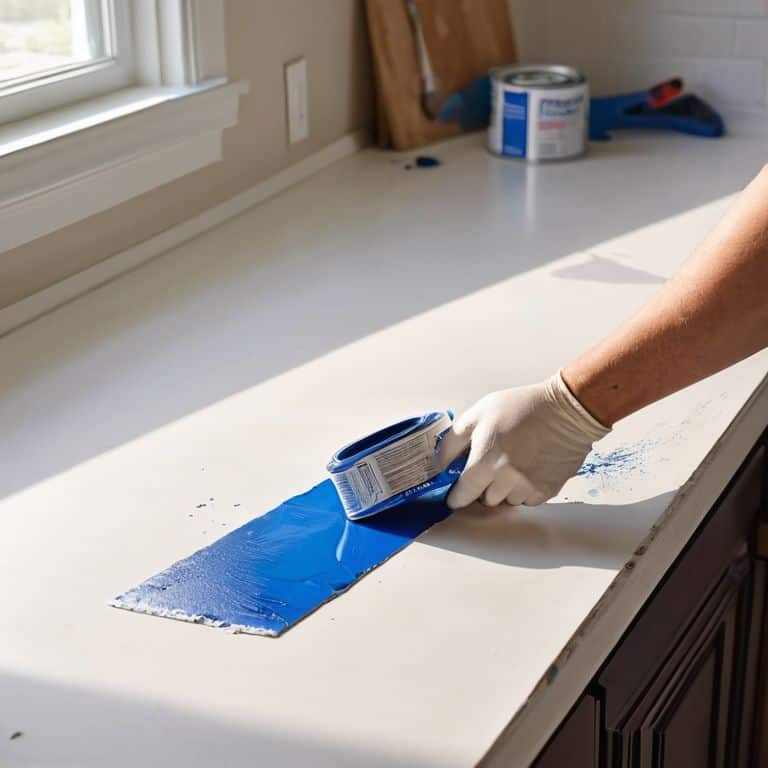
- 4. Apply a primer specifically designed for laminate surfaces. This will help the paint adhere to the smooth surface of the laminate. Use a high-quality primer and follow the instructions on the can for application and drying times. Make sure to apply the primer in a well-ventilated area and use a mask to avoid inhaling the fumes.
- 5. Once the primer is dry, sand the cabinets lightly to create a surface for the paint to adhere to. Use a fine-grit sandpaper and sand in the direction of the laminate’s grain. This will help the paint stick to the surface and prevent it from peeling off easily.
- 6. Now it’s time to apply the paint. Choose a high-quality paint specifically designed for cabinets and follow the instructions on the can for application and drying times. Apply the paint in thin, even coats, allowing each coat to dry completely before applying the next one. Use a roller for large surfaces and a brush for smaller areas and details.
- 7. After the final coat of paint is dry, replace the hardware you removed earlier. Make sure everything is securely attached and evenly spaced. If you’re using new hardware, now is the time to install it.
- 8. Finally, seal your cabinets with a clear coat of varnish to protect the paint and make them easier to clean. Apply the varnish according to the instructions on the can and let it dry completely before putting your cabinets back to use. This will give your cabinets a beautiful finish and make them last longer.
A Guide to Painting Laminate Cabinets
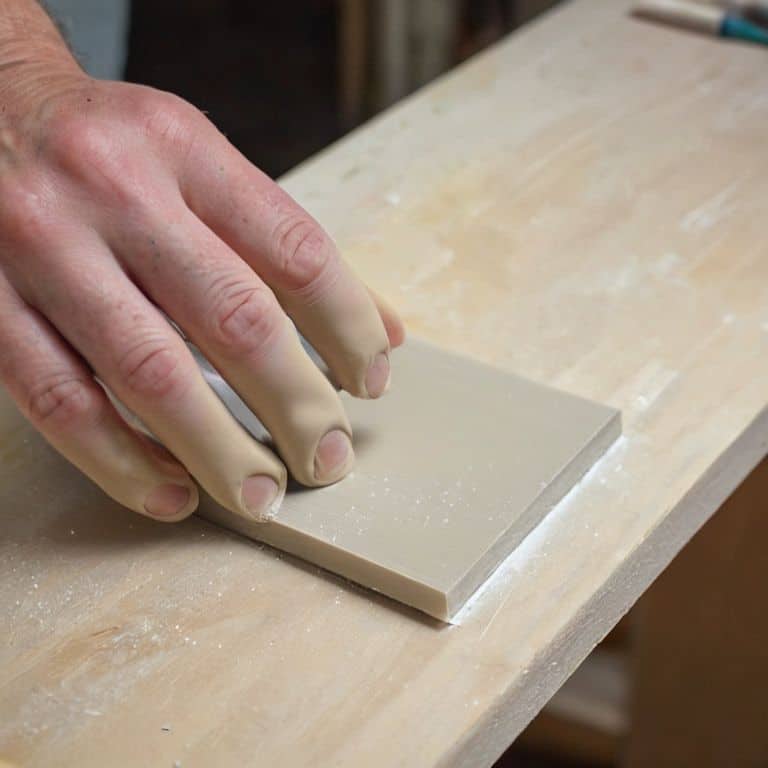
When it comes to preparing laminate surfaces for paint, it’s essential to create a strong bond between the paint and the laminate. I like to use a mixture of sanding and a specialized primer to ensure a smooth finish. This step may seem tedious, but trust me, it’s worth the extra effort. A well-prepared surface will make all the difference in the durability and appearance of your newly painted cabinets.
For a beginner-friendly approach, consider using cabinet painting techniques for beginners that focus on simple, yet effective methods. One of my favorite tips is to use a high-quality paint with a durable finish, such as a satin or semi-gloss. These finishes are not only easy to clean but also resistant to scratches and fading. When choosing a paint color, don’t be afraid to get creative and consider the latest cabinet paint color trends.
To take your laminate cabinet makeover to the next level, think about the overall aesthetic you want to achieve. Consider the style and color of your kitchen, as well as the natural lighting. You can find plenty of laminate cabinet makeover ideas online, but remember to choose a design that reflects your personal taste and complements your kitchen’s unique character. With a little patience and creativity, you can transform your drab cabinets into a beautiful, functional space that you’ll love spending time in.
Best Cabinet Paint Finishes for Durability
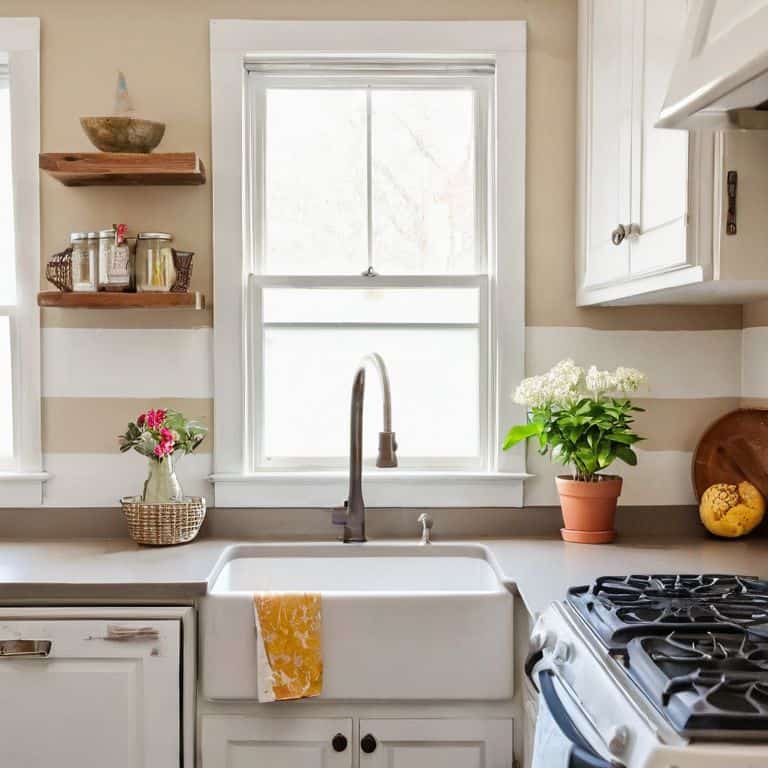
When it comes to choosing the perfect paint finish for your laminate cabinets, durability is key. I’ve found that a semi-gloss or high-gloss finish works wonders in withstanding the wear and tear of a busy kitchen. Not only do they make cleaning a breeze, but they also add a beautiful sheen to your cabinets. For my own tiny kitchen, I opted for a semi-gloss finish, and it’s been a game-changer – spills and splatters wipe right off, and the cabinets still look like new.
I recommend avoiding flat or matte finishes, as they can be prone to showing fingerprints and stains. If you want a more subtle look, consider a satin finish, which offers a nice balance between durability and aesthetic appeal. Trust me, with the right finish, your painted laminate cabinets will look amazing and withstand the test of time.
Preparing Laminate for a Flawless Paint Job
To get your laminate cabinets ready for a flawless paint job, start by giving them a good clean. I like to use a mixture of soap and warm water to wipe down the surfaces, making sure to remove any grease or food residue. Next, lightly sand the laminate to create a surface for the paint to grip. Don’t worry, this doesn’t need to be a heavy-duty sanding job – just a gentle scuff to help the paint adhere.
I also recommend filling any dents or holes with a wood filler and letting it dry completely before sanding it down to a smooth finish. This will ensure a seamless paint job and prevent any imperfections from showing through. With your cabinets clean, sanded, and filled, you’re ready to move on to the next step: priming and painting!
My Top 5 Tips for a Flawless Laminate Cabinet Paint Job
- Choose the right primer: I swear by a good bonding primer to ensure the paint adheres properly to the laminate surface
- Sand, sand, sand: Lightly sanding the cabinets before painting helps create a smooth finish and prevents any bumps or imperfections
- Don’t skip the cleaning step: A thorough clean with a degreaser before painting is crucial to remove any grease or grime that might affect paint adhesion
- Select a paint with a built-in primer: It’s a total game-changer for small kitchens like mine, as it saves time and reduces the number of coats needed
- Apply thin coats: It’s better to apply multiple thin coats of paint, allowing each coat to dry completely, rather than one thick coat that might end up drippy or uneven
My Top 3 Takeaways for a Successful Laminate Cabinet Paint Job
Always prep your laminate cabinets with a degreaser and a light sanding to ensure the paint adheres properly – trust me, it’s worth the extra effort!
Choose a paint finish that’s both durable and easy to clean, like a satin or semi-gloss finish, to keep your newly painted cabinets looking fresh and fabulous
Don’t be afraid to get creative with your cabinet color choice – a bold, bright hue can totally transform the look and feel of your tiny kitchen, and I’m living proof that even the smallest spaces can make a big impact!
Painting Laminate Cabinets: A Game-Changer
A fresh coat of paint on your laminate cabinets is more than just a cosmetic upgrade – it’s a chance to reclaim your kitchen’s personality and make the most of every square inch, no matter how small!
Maya Torres
Bringing Your Vision to Life
And that’s a wrap, folks! To recap, we’ve covered the essentials of painting laminate cabinets, from preparing the surface for a flawless paint job to choosing the best cabinet paint finishes for durability. We’ve also dived into the step-by-step process of transforming your drab cabinets into fab, functional pieces that reflect your personal style. Remember, the key to a successful paint job is in the details, so don’t skip out on those crucial prep steps and paint finishes. By following these simple, budget-friendly tips, you can give your tiny kitchen a much-needed makeover without breaking the bank.
Now that you’ve got the tools and know-how, it’s time to unleash your creativity and bring your vision to life! Don’t be afraid to experiment with different colors, finishes, and designs until you find the perfect fit for your unique space. As someone who’s been in your shoes, I can attest that the sense of accomplishment you’ll feel after completing this project is incredibly empowering. So go ahead, grab your paintbrush, and get ready to fall in love with your kitchen all over again. Happy painting, and don’t forget to share your before-and-after photos – I’d love to see your transformations!
Frequently Asked Questions
What kind of primer is best to use on laminate cabinets to ensure a strong paint bond?
For a strong paint bond on laminate cabinets, I swear by a high-bond primer specifically designed for shiny surfaces. My go-to is a latex-based primer with a built-in deglosser – it’s a total game-changer! Look for products labeled ‘adhesion promoter’ or ‘bonding primer’ for the best results.
Can I use a roller to paint my laminate cabinets or is a brush better for a smooth finish?
Honestly, I’m a brush girl when it comes to painting laminate cabinets – it gives me way more control and a smoother finish. Rollers can be too bulky and might leave texture or bubbles. For a flawless look, I swear by a good-quality brush, especially for those tight corners and edges. Trust me, it’s worth the extra effort!
How long does it typically take for the paint to fully cure and be ready for normal kitchen use?
Honestly, I’ve found that paint can take anywhere from 7-14 days to fully cure, depending on the type and brand. I like to wait at least a week before putting my cabinets back to normal use – it’s worth the wait to ensure a durable finish that can withstand kitchen chaos!