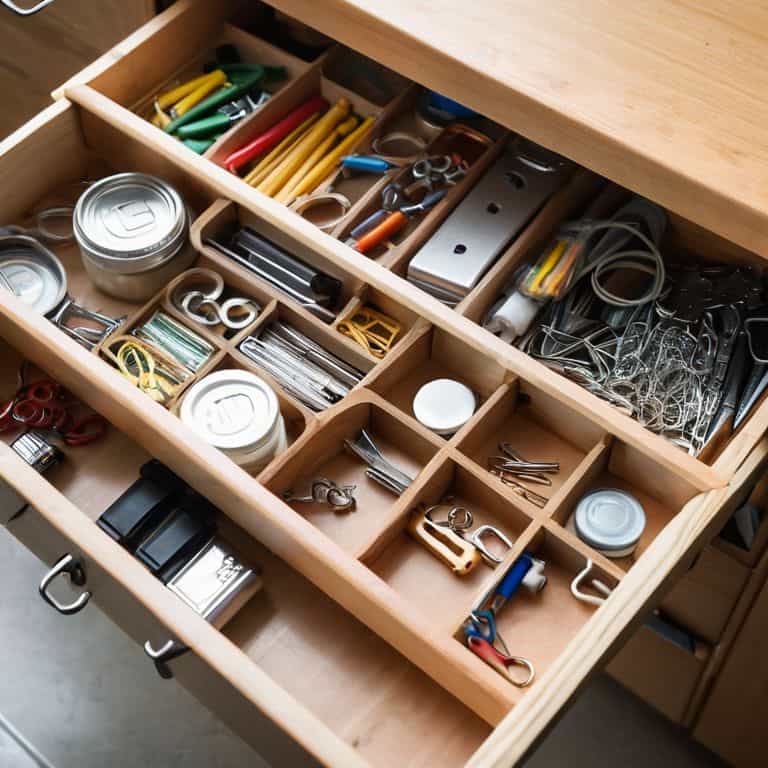
I still remember the day I decided to tackle the junk drawer on my sailboat – it was a mess of tangled wires, rusty screws, and expired coupons. But as I learned how to organize a junk drawer, I discovered that it’s not just about throwing everything into a fancy storage container. It’s about creating a system that works for you, and that’s exactly what I want to share with you in this article about how to organize a junk drawer. My approach is all about simplicity and functionality, and I’m excited to show you that even the most cluttered spaces can be transformed into peaceful havens.
In this article, I’ll be sharing my personal, tried-and-tested tips on how to organize a junk drawer. You’ll learn how to purge the clutter, create a customized storage system, and maintain your newly organized space with ease. I’ll be walking you through a step-by-step process that’s both simple and effective, so you can say goodbye to the frustration of digging through a messy drawer and hello to a more streamlined and efficient way of living. By the end of this article, you’ll have the knowledge and confidence to tackle your own junk drawer and turn it into a functional and peaceful space.
Table of Contents
Guide Overview: What You'll Need
Total Time: 1 hour 15 minutes
Estimated Cost: $10 – $20
Difficulty Level: Easy
Tools Required
- Measuring Tape (for measuring drawer dimensions)
- Pencil (for marking drawer and supplies)
- Scissors (for cutting adhesive-backed hooks or organizers)
- Utility Knife (with extra blades)
Supplies & Materials
- Adhesive-backed Hooks (various sizes)
- Small Baskets or Containers (approximately 6 inches wide and 4 inches deep)
- Dividers (custom-cut to fit drawer dimensions)
- Drawer Liner (cut to fit drawer bottom, approximately 1/16 inch thick)
Step-by-Step Instructions
- 1. First, let’s start by emptying the junk drawer completely. Yes, you read that right – everything comes out. This is the best way to get a sense of what you’re working with and to decide what’s worth keeping. I like to lay everything out on a large table or countertop, so I can see each item individually. It’s also a good idea to have a few boxes or bags on hand for items that are broken, expired, or no longer needed.
- 2. Next, let’s sort items into categories. I find it helpful to use small containers or trays to group similar items together, like office supplies or electronics. This will make it easier to decide how to store each type of item in the drawer. Be ruthless – if you don’t need it, get rid of it. Remember, the goal is to create a peaceful and functional space, not to hold onto every single paperclip you’ve ever owned.
- 3. Now that we have our categories, it’s time to think about storage solutions. I’m a big fan of using small containers, baskets, or trays to keep items organized and out of sight. For example, you could use a small plastic bin to store paper clips, push pins, and other small office supplies. Look for containers that fit the size and shape of your drawer, and don’t be afraid to get creative – you can use everything from vintage tin cans to repurposed cardboard boxes.
- 4. With our storage solutions in place, it’s time to think about vertical space. One of my favorite tricks for maximizing storage in a small drawer is to use magnetic strips on the side or back of the drawer. These can be used to store small metal items like scissors, knives, or even a spare set of keys. You can also use adhesive hooks to hang items like bags, cords, or other small accessories.
- 5. Next, let’s talk about labels. I know, I know – labeling can seem like a tedious task, but trust me, it’s worth it. Not only do labels help you quickly identify what’s inside each container, but they also add a touch of visual harmony to the space. You can use a label maker or even just write on the containers with a marker – whatever works for you. The key is to make sure the labels are clear, concise, and easy to read.
- 6. Now that everything is sorted, stored, and labeled, it’s time to think about maintenance. To keep your newly organized junk drawer from devolving into chaos, I recommend implementing a simple one-in, one-out rule. This means that every time you bring a new item into the drawer, you have to get rid of an old one to make space for it. It’s a simple trick, but it’s amazing how well it works.
- 7. Finally, let’s talk about upkeep. To keep your junk drawer organized and clutter-free, I recommend setting aside a few minutes each week to tidy up. This can be as simple as wiping down the containers, throwing away any trash, and making sure everything is still in its assigned spot. It’s also a good idea to schedule a deeper clean every few months to get rid of any clutter that may have accumulated. By following these simple steps, you can keep your junk drawer organized and functional for months to come.
Sailing to Junk Drawer Serenity
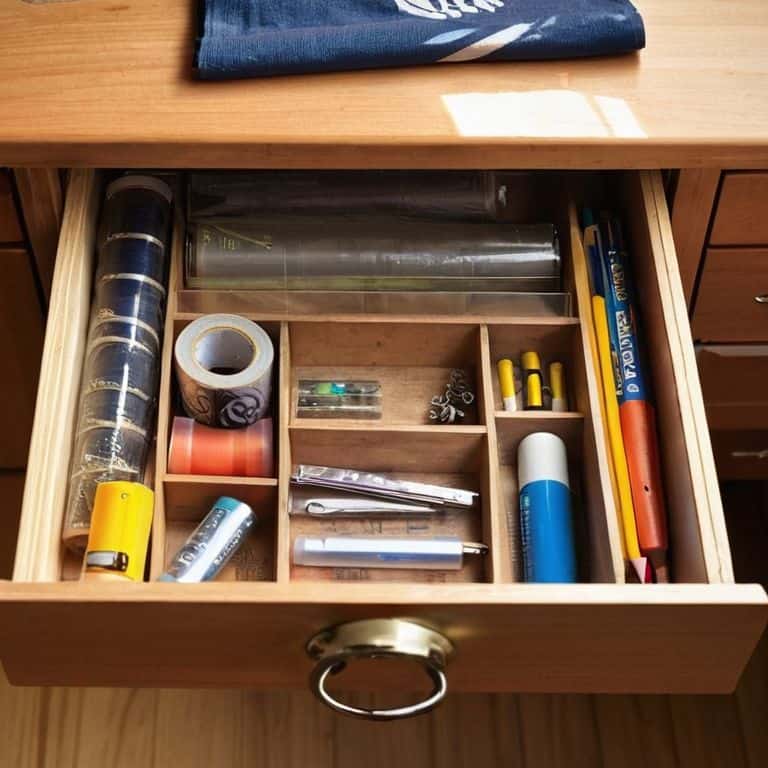
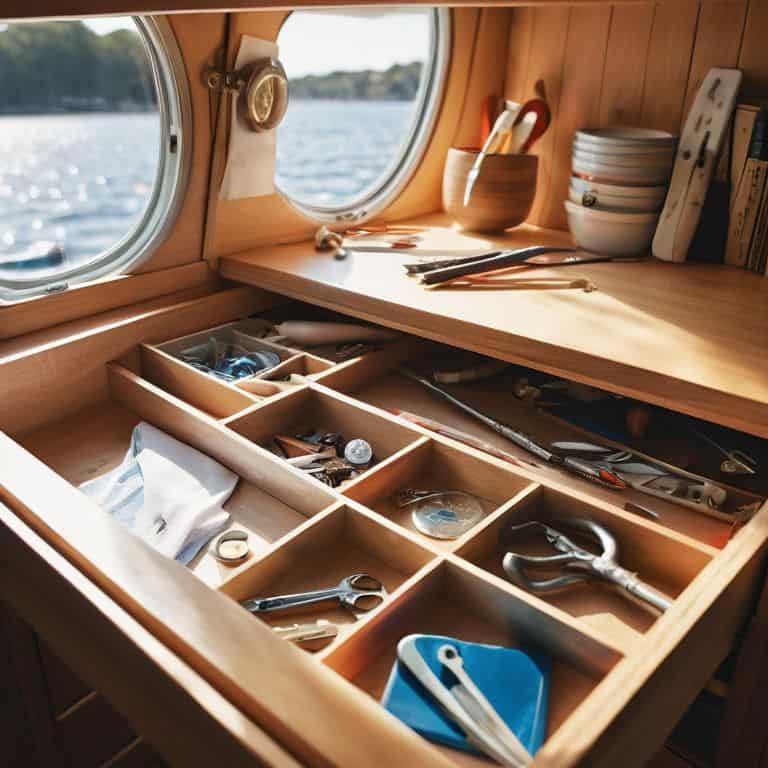
As I reflect on my time living on a sailboat, I realize that maximizing drawer space was crucial to maintaining a sense of calm in our tiny home. One of the most effective strategies I employed was the use of custom drawer dividers, which allowed me to separate items into distinct categories and prevent clutter from building up. By implementing this simple solution, I was able to transform our junk drawer from a chaotic mess into a peaceful oasis.
When it comes to decluttering tips for beginners, I always recommend starting with a thorough purge of unnecessary items. This involves taking everything out of the drawer and sorting items into three piles: keep, donate, and discard. By being ruthless about what you truly need, you can free up valuable space and create a more streamlined storage system. As you’re sorting, consider implementing junk drawer storage solutions that make the most of your available space, such as stackable containers or adhesive hooks.
In my experience, the key to maintaining a clutter-free junk drawer is to establish a routine of regular tidying and maintenance. This might involve setting aside a few minutes each week to organizing small spaces and ensure that everything is still in its designated place. By staying on top of clutter and making adjustments as needed, you can enjoy the benefits of a serene and functional junk drawer for years to come.
Maximizing Drawer Space for Peaceful Living
To truly maximize drawer space, I rely on my trusty hooks and magnets. On my sailboat, these little gems helped keep essentials within reach while maintaining a clutter-free environment. By installing hooks on the back of the drawer or on adjacent walls, you can hang items like bags, accessories, or even cleaning supplies, freeing up valuable drawer real estate. Meanwhile, magnets can be used to store small metal items like paperclips, pushpins, or even spice containers, adding to the overall sense of serenity.
This approach not only saves space but also creates a sense of visual calm, making it easier to find what you need when you need it. By thoughtfully utilizing vertical space, you can transform your junk drawer into a haven of organization and tranquility, much like the peacefulness of a well-organized sailboat cabin.
Taming the Storm With Custom Dividers
As I reflect on my sailboat days, I realize that custom dividers were a game-changer for maintaining order in tight spaces. By creating separate compartments, I could assign a home for each item, making it easier to find what I needed in a pinch. This same principle applies to taming the storm of your junk drawer. By installing custom dividers, you can categorize and contain items, preventing them from getting jumbled together.
I like to use wooden or plastic dividers, which can be easily cut to size and arranged to fit your specific needs. For example, you can create a section for office supplies, another for tools, and a third for miscellaneous items. This simple yet effective solution helps maintain the sense of calm and control you’ve worked hard to establish in your newly organized junk drawer.
Navigating to a Clutter-Free Haven: 5 Essential Tips
- Start with a clean slate: Empty your junk drawer completely and sort items into categories to get a clear picture of what you need to organize
- Assign a home for each item: Use hooks, magnets, or small containers to designate a specific spot for frequently used items, keeping them accessible and out of the way
- Implement a ‘one-in, one-out’ policy: To maintain your newly organized junk drawer, adopt the rule that for every new item you add, an old one must be removed or donated
- Optimize your drawer’s vertical space: Utilize stackable trays, baskets, or dividers to maximize storage capacity and keep your junk drawer from becoming a cluttered mess
- Schedule regular ‘drawer audits’: Set a reminder to review your junk drawer’s contents every few months, ensuring that it remains organized and clutter-free over time
Key Takeaways for a Clutter-Free Junk Drawer
By implementing simple storage solutions and custom dividers, you can transform your junk drawer into a peaceful and functional space
Maximizing vertical space and using hooks and magnets can help keep your junk drawer organized and clutter-free, making it easier to find what you need when you need it
Remember, maintaining a clutter-free junk drawer is all about adopting a ‘one-in, one-out’ rule and regularly tidying up to prevent chaos from creeping back in, allowing you to enjoy a more serene and organized living space
Serenity in a Single Drawer
The junk drawer is not a lost cause, but a blank canvas waiting for the brushstrokes of intention and simplicity – where every item has a home, and every home has a story.
Miles Corbin
Sailing into a Clutter-Free Horizon
As we conclude our journey to organize the infamous junk drawer, let’s recap the essentials: we’ve learned to tackle the chaos with simple tricks, customized dividers, and a focus on maximizing drawer space. By applying these principles, you’ve transformed your cluttered junk drawer into a peaceful little haven, much like I did on my sailboat. Remember, it’s all about creating a system that works for you and sticking to it with a ‘one-in, one-out’ rule to maintain your newly found serenity.
Now that you’ve experienced the joy of a clutter-free junk drawer, I encourage you to extend this sense of calm to other areas of your life. Imagine the freedom to focus on what truly matters, unencumbered by the weight of disorganization. As you continue on your journey to a more organized, peaceful living space, keep in mind that every small step counts, and the sense of accomplishment you’ve gained from taming your junk drawer can be a powerful catalyst for even greater transformations.
Frequently Asked Questions
What are some creative ways to repurpose old containers or materials to use as dividers in my junk drawer?
I love repurposing old containers as dividers. Try using mason jars, cardboard tubes, or even vintage wooden crates to separate items in your junk drawer. You can also cut up old plastic containers or file folders to create custom inserts. Get creative and have fun with it – it’s a great way to breathe new life into old materials and keep your drawer organized.
How can I maintain my newly organized junk drawer and prevent clutter from building up again?
To keep your junk drawer serene, I swear by my ‘one-in, one-out’ rule: for every new item, remove or donate an old one. Regularly schedule a ‘drawer refresh’ to maintain your custom dividers and tidy up any chaos that’s crept in. Trust me, it’s a game-changer!
Are there any specific types of items that should be kept out of a junk drawer to ensure it remains organized and functional?
To keep your junk drawer organized, I recommend keeping items like important documents, valuable jewelry, and sensitive electronics out of it. These items deserve a more secure and protected space. Instead, reserve your junk drawer for everyday essentials like batteries, tape, and scissors. This will help maintain a clutter-free and functional space.